Load DJI Osmo 4K video in Premiere Pro CC with easy

Description: If you have trouble in importing or editing DJI Osmo 4K videos in Premiere Pro CC, read here to help you. 

A new shake-free robotic-like camera called Osmo, produced by the drone maker DJI, includes some key features and an affordable price tag, which could make it the next-generation selfie stick. The gadget contains a built-in swiveling camera and high-tech innovative stabilization system that allows for on-the-go videos and selfies in crisp and clear ultra-high definition (UHD) 4K resolution. It connects to iPhones and iPads via Wi-Fi connectivity. Maybe you want to load DJI Osmo 4K videos to Premiere Pro CC, but sometimes that is a little difficult. 

In order to import DJI Osmo 4K video to Premiere Pro CC quickly, we suggest convert DJI Osmo 4K video to better edited by Premiere Pro CC. According to many tests, you can use Pavtube Video Converter Ultimate to help you. With three clicks, you can easily convert any DJI Osmo 4K videos to Premiere Pro CC more friendly videos. Moreover, this ideal converting tool is equipped with basic editing functions including trimming, cropping, adding watermark, removing audio and more. 

Free download and install 


Other Download: 

- Pavtube old official address: http://www.pavtube.cn/blu-ray-video-converter-ultimate/ 
- Cnet Download: http://download.cnet.com/Pavtube-Video-Converter-Ultimate/3000-2194_4-75938564.html 


Efficient Way to Edit DJI Osmo 4K video in Premiere Pro 

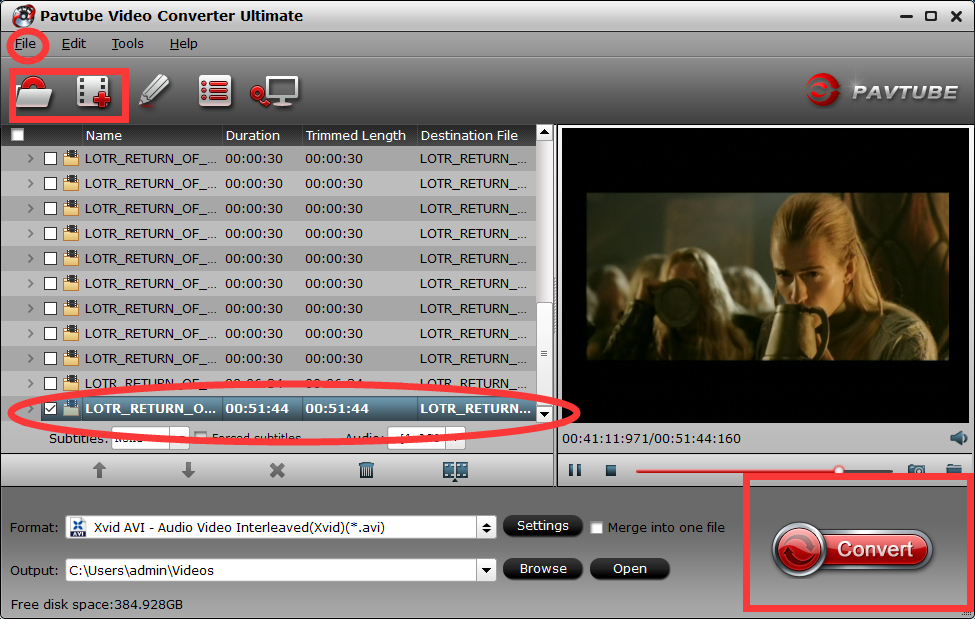
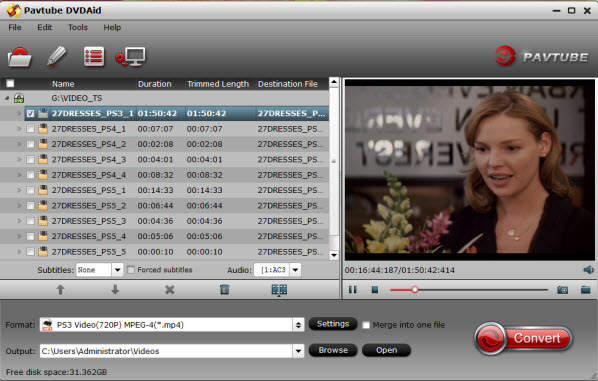
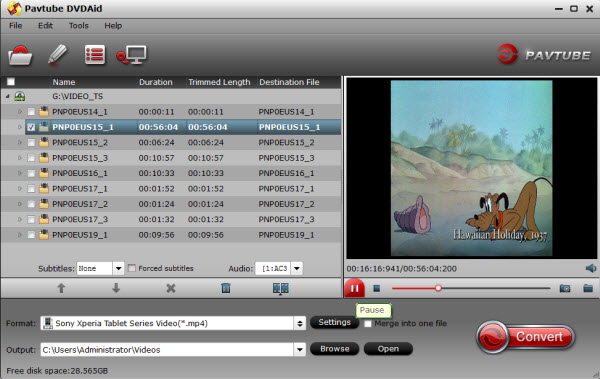
Step 1: Load the DJI Osmo 4K video to the program 

Install and run the 4K Video Converter, and then import the source DJI Osmo 4K videos to it. To do so, you can directly drag & drop the files onto the main interface, or you can click the "Add video" icon to locate the videos from your local disk.


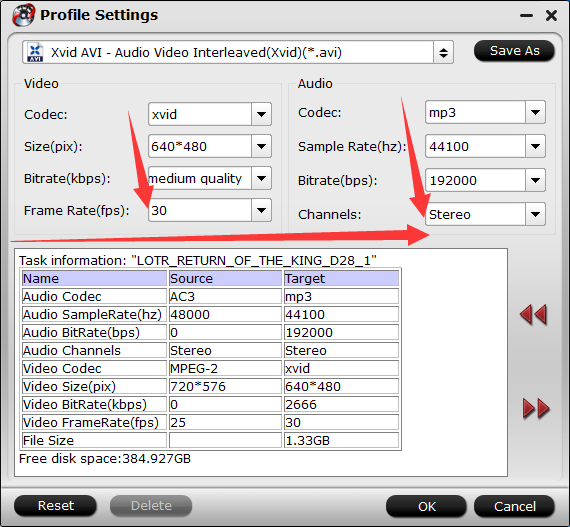
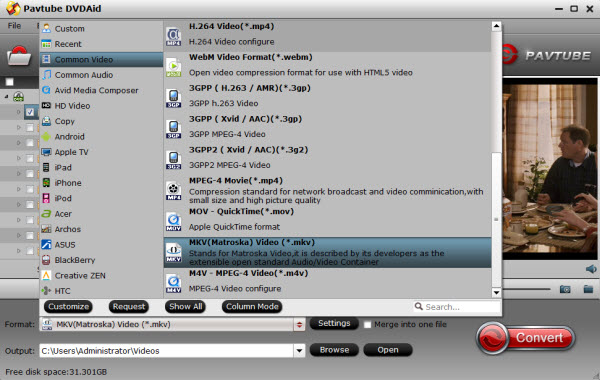
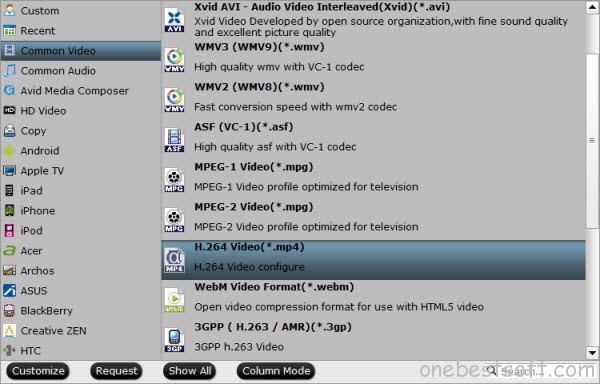
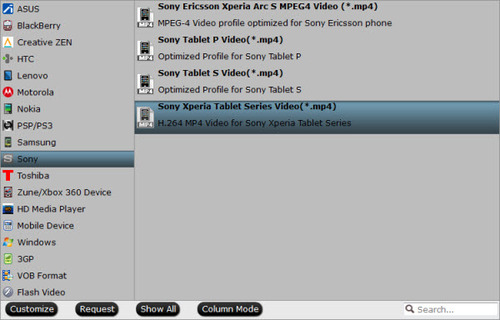
Step 2: Set output video format 

Click "Format" pull down list to select Adobe Premiere/Sony Vegas> MPEG-2(*.mpg) as the best video format for Premiere Pro. WMV, MOV formats are the good choice as well. 


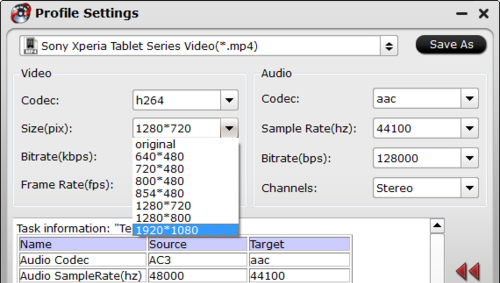
Tip: Click the "Settings" button, you are able to enter the "Profile Settings" panel to adjust video and audio parameters for the converted files, including video size, bit rate, frame rate and more.You can keep the original 4K resolution but also can adjust to 2K, 1080p video size just according to your needs. 

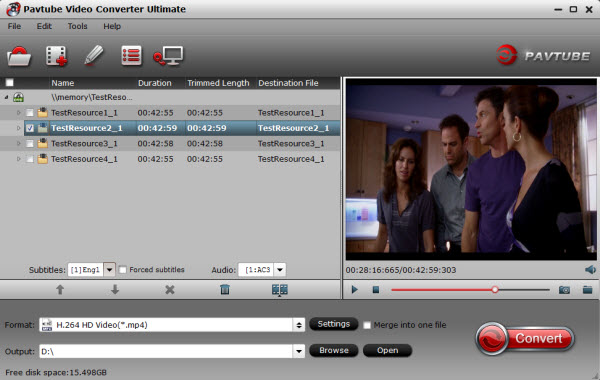
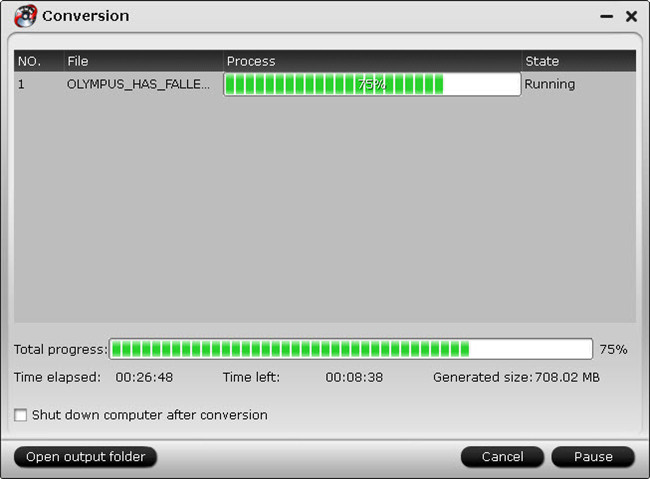
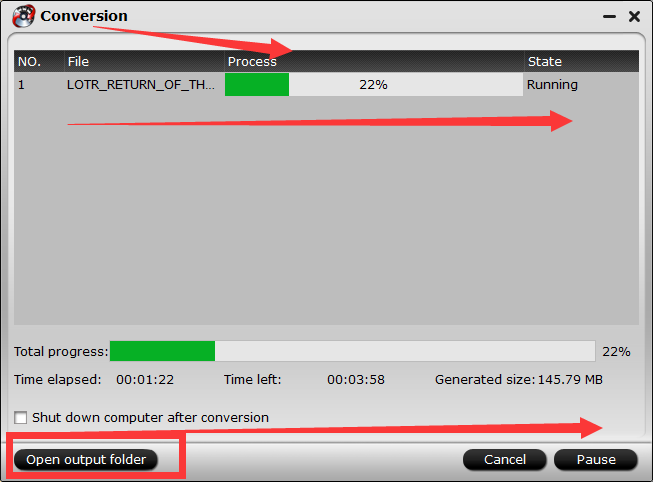
Step 3: Begin to convert DJI Osmo 4K video to Premiere Pro 

When you finish the settings, you can press the big "Start conversion" button to kick off the conversion. By using this professional 4K to Premiere Pro Converter, the conversion will be finished with ultrafast speed and the best video quality kept. After the conversion, you can then edit the DJI Osmo 4K video in Premiere Pro CC/CS6/CS5 smoothly. 


More Topics: 


Pavtube Upgraded to Support Blu-ray MKB61

Hot news for Blu-ray collectors!! Are you still upset that you can't rip your new bought Spectre 007, The Martian,The Revenant cause these new Blu-rays now have been encrypted with more complex encryption mechanism MKB61 Now, you are saved by Pavtube in that Pavtube Studio has upgraded his main 3 Blu-ray ripping tools to 4.8.6.7 version to support the new Blu-ray MKB61.


Usually, you perhaps know that Blu-ray is protected by AACS, BD+,UOP,DRM, HDCP, BD-ROM, Region codes, etc. This encryption prevents people from copying, ripping and converting their legally bought Blu-rays even they just rip it for personal use. Normal Blu-ray ripping applications on the market can rip AACS, BD+ schedule but no other difficult encryption mechanism. Even powerful as MakeMKV, supports only Blu-ray encryption up to v60, not including MKB61.
This time, Pavtube upgraded his three top-ranked Blu-ray Ripper BDMagic, ByteCopy, Video Converter Ultimate to the newest 4.8.6.7 version supporting to decrypt new Blu-ray encrypted with AACS, BD+,Region codes, HDCP up to MKB61.Now, let's learn the upgrade and the main features of each Blu-ray ripping tool.

What's new ?

1.support latest Blu-ray MKB61.
2.fix some bugs.

Key features of ByteCopy

- 1:1 backup BD/DVD with original video structure.
- Main title copy BD/DVD with smaller size.
- Copy BD/DVD to MKV with lossless quality.
- Convert BD/DVD to MP4/MOV/AVI with multiple subtitle/audio streaming.
More functions of ByteCopy is in the review.

Key features of BDMagic

- Full copy and directly copy Blu-ray and DVD
- Convert Blu-ray/DVD to SD/HD MP4, MKV, AVI, etc to NASExternal Hard DriveMedia Server, etc.
- Convert 4K Blu-ray to H.265/HEVC 4K MP4/MKV
- Rip Blu-ray preserving AC3, AAC, DTS audio in stereo, 5.1, 7.1 sound.
More functions of BDMagic is in the review.

Key features of Video Converter Ultimate

- Decrypt Blu-ray and DVD to virtually any SD/HD video
- Convert 4K Blu-ray to SD/HD MP4, WMV, MOV, QuickTime, ProRes for editing in NLE.
- Copy Blu-ray/DVD to M3U8 for HTTP live streaming
- Convert, shrink, compress Blu-ray, DVD to YouTube, FaceBook, Vimeo, Instagram, Google Plus, etc.
More functions of Video Converter Ultimate is in the review.

The Blu-rays you can Decrypt:

You can use Pavtube Blu-ray Ripper to decrypt some new released Blu-ray including: The RevenantThe MartianHannibal TV Series, Game of Throne (1-6), Spectre 007Zootopia, Harry Potter, Independence Day, The Divergent Series: AllegiantThe WalkAvatarHouse of Cards, Bridge of Spies, Mad Max: Fury Road, Room, Spotlight, X-Men: Apocalypse, The Family Fang, Ben Hur, Roots, Code of Honor, Now You See, Finding Dory, Arch Angels, Shchedrin: The Secret Life of Pets, Sherlock, Ghost Rider / Hellboy, The Da Vinci Code, Pete's Dragon, Ice Age: Strong and Proud, Star Wars: The Force AwakensLondon Has FallenFifty Shades of Grey, Kingsman-The Secret Service, etc.
What's more, Pavtube Studio is holding on Summer Vacation Promotion. Buy Blu-ray Ripper in this period, you may get some surprise:
In addition, Pavtube Studio also upgraded his Video DVD Converter Ultimate to support users to rip any new released commercial DVD discs to MP4, MOV, MKV, 3GP for using on iPad Pro, iPhone 6S, Galaxy S7/S7 Edge, HTC 10, Nexus 6p, Xperia Z6, etc.
Src: Read more

Ripping DVD films to Samsung Galaxy Tab S2 to playback

Samsung Galaxy Tab S2s share a lot of similarities with the iPad Air 2 and Mini 3: all have the same 2048×1536 display resolution. The 9.7-inch model with Android Lollipop 5.0.2 is not only a fantastic looking device, it’s also the most powerful tablet that Samsung has ever built. So, there is no pressure transfer some DVD movies to Galaxy Tab S2 for playing on spare time. Here I will throw a quick tutorial up on how to rip and copy DVD movies to Galaxy Tab S2 while keeping the best video quality. 

But, if you don’t rip and convert DVD to Galaxy Tab S2 playback format, You can not play DVD movie on your Tab. Because first your backup movies from the DVD is too big to transfer the files into your Galaxy Tab S2, next Galaxy Tab S2 doesn’t support DVD files playback directly. So for watching DVD movies on Samsung Galaxy Tab S2, you have to convert DVD to Galaxy Tab S2 supported formats. First, the most important piece of the equation is that you have a DVD Ripper in hand.

If you are looking for a powerful integrated tool to convert videos, Blu-ray movies and DVDs to your Samsung Galaxy Tab S2, Galaxy Tab 2, Galaxy Tab 3, Asus Transformer Prime, Transformer Pad Infinity TF700, Google Nexus 9, Google Nexus 10/7, Kindle Fire HDX, Galaxy S6/A8, Nook HD, etc at the same saving time and effort, the all-in-one Pavtube Video Converter Ultimate program will be a nice choice for you. If you are running a Mac OS X computer, iMedia Converter for Mac is the alternative.

Note: If you are on Mac,to ripping DVD to Galaxy Tab S2 on Mac (El Capitan included).

Free download and install 


Other Download:
- Pavtube old official address: http://www.pavtube.cn/blu-ray-video-converter-ultimate/
- Cnet Download: http://download.cnet.com/Pavtube-Video-Converter-Ultimate/3000-2194_4-75938564.html


How to Convert DVD to Galaxy Tab S2 with Suitable format


Step 1: Load DVD files

Insert DVD disc into BD Rom. Install and run this best Galaxy Tab S2 DVD Converter on your computer. Click “Load Disc” to load your files. You can just simply to drag and drop your backuped files into this program.


Step 2: Select suitable format


Pavtube BDMagic offers many optimized video format for different devices. Just click “Format” bar to find “Samsung” profile. Here, you can choose “Samsung Galaxy Tab H.264 (*.mp4)” format. 


Note: According to Samsung Galaxy Tab S2 specification, Galaxy Tab S2 supports MPEG4, H.263, H.264, DivX, XviD and WMV videos. 

Step 3: Customize output settings


Besides, click “Settings” button on the interface, you will be able to check and adjust the video and audio parameters like bitrate, size, channels, etc. Just do it when you need.


Step 4: Start Converting DVD


Click “Convert” button to start DVD to Galaxy Tab S2 conversion. DVD to Galaxy Tab S2 Converter, which allows you to convert DVD up to 6X faster than other converters on the market.


Step 5: Transfer DVD to Galaxy Tab S2

After DVD to Galaxy Tab S2 conversion, click “Open Folder” button to locate the converted video files. You can transfer DVD movies to Galaxy Tab S2 via USB cable after connect Galaxy Tab S2 to your computer.


Now, you can imagine how wonderful it is to watch your favorite DVD movies on Galaxy Tab S2 on spare time for freely.

Additional Tips:


How to Convert DVD to MKV in H.264/H.265 codec Easily?

For DVD collectors, it is convenient for them to rip their DVD to popular video formats to play on the portable devices. However, there are too many video formats for you to choose. Here, I suggest you to convert DVD to MKV in H.264/H.265 codec. 

Reasons for converting DVD to MKV in H.264/H.265 codec? 

1.a complete movie in a single file, including many audio, video and subtitles streams. 

The MKV format is capable of holding unlimited number of video, audio and subtitle tracks, along with any metadata. Practically this means it is possible to put an entire movie with multiple sound and subtitle tracks and movie thumbnail into single MKV file. 

2.Lossless video and audio quality can be retained. 

MKV is a container format that supports various codecs, including H.264, H.265, VC-1 etc. The MKV in H.264/H.265 codec format makes it possible to keep original video or audio compression format when copying DVD movie to MKV files. 

PS.: If your devices support H.265 format, you’d better convert DVD to MKV in H.265 codec, which can keep a high quality with a small video size. But if your devices do not support H.265, then, h.264 format is also a good choice for you to enjoy a high-quality movie. 

How to convert DVD to MKV in H.264/H.265 codec? 

Similar to Blu-ray, DVD is also equipped with variety of protections to prevent DVD content from being illegal use. So, in order to convert DVD to MKV in H.264/H.265 codec, you have to use a DVD ripper to realize the conversion. Here, an award-winning DVD Ripping tool called Pavtube DVDAid is recommended to you.(review

The program outflanks its competitors with many remarkable functions. It can convert DVD not only to MKV in H.264/H.265 codec with no quality loss, but also to other popular file formats or multimedia playback device optimized file formats. The program also boasts with other bonus features. As for subtitle aspect, your DVD movies may contain many subtitle tracks in multiple languages, you can select one from your original DVD movies as your desired subtitles. You can also check “Forced subtitles” option so that you only see subtitles when the actors are speaking a different language. 

Free download and install: 
  

Other Download: 
- Pavtube old official address: http://www.pavtube.cn/dvd_ripper/ 
- Cnet Download: http://download.cnet.com/Pavtube-DVDAid/3000-7970_4-76158510.html 

Steps to convert DVD to MKV in H.264/H.265 codec 

Step 1. Load DVD disc 

Insert DVD disc and then launch the app. Click "Load from disc" button to browse to disc drive and import DVD into this app. The program checks the title of main movie automatically, and you can simply choose language of audio and subtitles for output and check in preview window. 


Step 2: Set output format 

Select “MKV(Matroska) Video (*.mkv)” as output format from “Common Video” category under the drop-down list of “Format”.  


Tips: If you want to get better HD video quality, just select “MKV HD Video (*.mkv)” from “HD Video” category. 

Step 3: Customize MKV in H.264/H.265 codec 

Click "Settings" to pop out "Profile Settings" window, set output video codec to H.264/H.265. Besides, you can also adjust size, bitrate, frame rate according to your own needs. 

Step 4: Start to convert 

Back to the main interface, hit right-bottom “Convert” button to carry out the conversion process. After the conversion, hit the “Open output folder” on the main interface to get the converted DVD files from the program. Now, your can enjoy your DVD movies on your portable devices. 

Now, come to Pavtube Christmas Coupon and you can get the app at a big discount. 

Related Articles:[/b] 

Copy Hannibal: Season 3 DVD Movies to Google Pixel C Tablet

Summary: How to play Hannibal: Season 3 DVD Movies on Google Pixel C tablet? Free download DVD to Pixel C converter, rip Hannibal: Season 3 DVD Movies DVD to Pixel C supported MP4 format, and then play DVD movies on Google Pixel C tablet freely. 

Hannibal: Season 3 DVD Movies Summary: 

On the run after leaving a gruesome and emotional scene in the United States, Hannibal and Dr. Du Maurier assume new identities in Italy. But the warped killer's past entanglements with the FBI are never far behind. Hannibal Season 3 DVD was not a result of the Boston Marathon bombings as some reports have indicated, but was actually decided just hours beforehand. Fuller said of the decision, "With this episode, it wasn't about the graphic imagery or violence. It was the associations that came with the subject matter that I felt would inhibit the enjoyment of the overall episode. It was my own sensitivity... We want to be respectful of the social climate we're in right now". 

Q: " I love this series so much, I will become a psychopath if they cancel... haha just kidding... my friend told me that we can even get the Hannibal: Season 3 DVD Movies on Google Pixel C Tablet for watching on the go, that sounds great! Any good suggestions?" 

Hot Search: Blu-ray on Google Pixel C | iTunes Movies onto Pixel C | Android Solutions | Top 5 Android App | Digital Copy to Android 

Google Pixel C runs Android 6.0 Marshmallow OS, it uses Nvidia’s Tegra X1 chipset with a quad-core CPU and Maxwell GPU, paired with 3GB of RAM. This tablet has a 10.2-inch display, and the resolution of the screen is 2560 x 1800 and a density of 308ppi. With Google Pixel C tablet you can get vivid images, so it is ideal for you to copy Hannibal: Season 3 DVD Movies from computer to Pixel C for watching. In this article we will share the best way to convert DVD to Pixel C supported video format, and then you can play DVDs on Pixel C tablet without limitations. 

In order to make you watch Hannibal: Season 3 DVD movies on Google Pixel C, we specially find some ways to realize it. The direct and easy way is to convert Hannibal: Season 3 DVD movies to Google Pixel C supported videos on computer. The entire DVD conversion only needs three clicks on the mouse. Pavtube DVDAid is designed for you. (Now, you can get 40% OFF discount from Pavtube Christmas Coupon.) It is a professional DVD movies to Google Pixel C converter in market today. 

Customer review about the top DVD Ripper for Google Pixel C: 

The program is easy to use for editing and conversion and makes great quality copies of my Hannibal: Season 3 DVD. It can help you rip and convert all the DVD Discs even DVD ISO/IFO image files. The audio/video synchronization is very good, the size of the subtitles too. The time it takes to convert in this software is almost half that in other. Read the review

Simple Guide of Converting/Putting Hannibal: Season 3 DVD movies to Google Pixel C 

Step 1: Launch the excellent DVD movie converter for Google Pixel C, and load your DVD movies to it. (No matter from the DVD discs, DVD folder, DVD ISO/IFO image files.) 


Step 2. Set right output format. Click "Format" bar, and select .mp4 from "Common video" or "HD video" to fit Google Pixel C. 


Tips: The default settings may not satisfy you, and you can click the "Settings" button to change the settings by yourself including video resolution, bit rate, audio sample rate, audio channel etc. for full screen playback smoothly. Or keep no changes, which is also a good choice. 

Step 3. Click the "Start conversion" button on the main interface and the software will start to convert Hannibal: Season 3 DVD movies to Google Pixel C at once. 

When the conversion finished, click "Open" to find the converted video files. Then you can effortless transfer the video files to Google Pixel C for playback on the go. Just have a try, wish you a nice day! 

Note: For Mac users, you can turn to Pavtube DVDAid for Mac to realize the conversion. And it has updated to support the newest Mac OS X El Capitan. 

Related articles 

Backup DVD to Sony Xperia Z3 with original quality

As long as we glance at the smartphones world, Sony Xperia Z3 is a good choice. Do you have problems to copy DVD to Xperia Z3? In this article you will get the best DVD Ripper software which can help you to rip DVD to Xperia Z3 supported format, and then you can play DVD on Xperia Z3 freely.


Sony Xperia Z3 is the premium smartphone that does more and goes further, which is equipped with 5.2-inch screen size, 2.5 GHz Quad-Core processor, 20.70 million pixels meaning to go along with you everywhere to capture the most unforgettable moments and let you enjoy time-duration you want. However, for some movie fans like you, there exist some troubles for the Z3 doesn't have a DVD drive for DVD movie playback while you have a large DVD collection.

Here, What you need is to convert DVD to Xperia Z3 supported video formats like MP4. And Pavtube DVDAid is just an ideal tool to get that done in clicks. It has Xperia Z3 -ready output modes, which means that you can effortlessly get DVD movies playable on Xperia Z3 in several clicks with fast ripping speed and high output video quality. It also has outputs for all the other Sony Xperia models, as well as the Z2, M, Z1S. What's more, you can use this DVD converter to crop the black bars, add special video effects, split or merge video, etc. And the conversion speed is very fast. Don't hesitate any more. With it, you can make your videos more interesting.

Tips: If you’re using a Mac, you can turn to it equivalent Mac version Sony Xperia Z3 DVD Ripper for Mac. Now, Just download the right version and follow the step-by-step guides to achieve your goal smoothly.

Step-by-Step: Convert DVD movies to Sony Xpeira Z3 MP4  

Step 1. Load DVD movies 


Run this best DVD Ripper for Sony Xpeira Z3, please click “Load Disc” button on the top left corner to import the DVD disc, DVD ISO file, DVD folder.


Step 2. Choose suitable format for Sony Xperia Z3 

Choose Output Video Format Since you need to rip DVD to Sony Xperia Z3, choose “Sony Xperia Tablet Series Video(*.mp4)” under “Sony” button as your output video format.


Tips: 

1. Click “Settings” button to adjust video and audio parameters like bitrate, size, audio channels, etc to meet your requirement.To get 1080p resolution playback on Sony Xperia Z3, you can set output size at “1920*1080”.


2. To rip DVD movies with your preferred subtitle or audio track, you can select any subtitle or soundtrack from your source BD files with the options “Subtitle” and “Audio”

Step 3. Start DVD to Xperia Z3 Conversion 

Hit the big “Convert” button to start converting DVD for Sony Xperia Z3 and if you do not remember the location of generated files, click “Open” button to find it quickly and transfer to Xperia Z3. Just enjoy it!   

Now, get entertainment and take your favorite DVD movies anytime and everywhere you want with this great device - Sony Xperia Z3.  


Related articles 

The troubleshooting in MOV to Sony Vegas

“How can I best convert .mov from iPhone into a nice-to-work-with format in Sony Vegas? Or what do the professional people do when facing different formats such as .mov.”

Although Sony Vegas announced that it can deal with a wide variety of video files including MOV, people still encounter many problems when importing MOV to Sony Vegas Pro for further video editing.

Why Sony Vegas not support MOV files? There may have two reasons, one is application or codec missing, your PC must have QuickTime installed, but this can't solve problems completely, you still have to install the proper codec, as MOV is a container instead of a codec. the MOV may contains a video codec that Sony Vegas can't recognize, for instance, some persons can load the QuickTime MOV files to Sony Vegas, however, there is no audio displayed in its timeline. Another one is file compatibility, for example, MOV files do not always work in Sony Vegas, the new JVC GY-HM700 records in MOV (for FCP) format and they don't show any video but do show audio.

Luckily, you can get the MOV recognized by Sony Vegas Pro easily. What you need is only a common video converter that can convert MOV to Sony Vegas compatible WMV or MPG files. Here Pavtube Video Converter Ultimate is highly recommended to help you convert MOV videos to Sony Vegas compatible format, like WMV. It supports creating high quality WMV or MPEG-2 codec to seamlessly fit Sony Vegas, no matter what's the format of your source video files. Moreover, it supports converting almost all Sony Vegas unlike audio formats like MP4, OPUS, Vorbis, FLAC, XWM, M4B, MKA, etc. to Sony Vegas supported audio formats such as MP3, WAV, WMA, M4A, etc. Now, Download and install this wonderful MOV to Sony Vegas Converter and then follow the steps below to have a try. 

Free download and install 
  

Other Download: 
- Pavtube old official address: http://www.pavtube.cn/blu-ray-video-converter-ultimate/ 
- Cnet Download: http://download.cnet.com/Pavtube-Video-Converter-Ultimate/3000-2194_4-75938564.html 

Step 1. Add MOV file 

It is quite easy to import file to the program: just drag and drop your MOV that you want to open in Sony Vegas to the main interface of this MOV to Sony Vegas Converter. Or click "Add video" button on the top to open MOV file from your computer. 


Step 2: Select output format 

Click the format column to choose output format. For Sony Vegas editing, you can choose "WMV (VC-1) (*.wmv)" under "Adobe Premiere/Sony Vegas" option. 


Tips: If the default settings do not fit your needs, you can click "Settings" button to customize output video parameters like bitrate, channels, frame rate, etc, such as to set higher bitrate to get much better image quality. In general, the higher video bit rate, the larger output file size, and vice versa. 

Step 3. Start the conversion 

When all settings are ready, click the ”Start conversion” button to start converting your videos. The progress bar will show how much time is needed. When the conversion completes, get the videos and run Sony Vegas to import them for editing. 


Related articles