Showing posts with label Media Player. Show all posts

Convert MP4 On DVD Player

It is well known to us that DVD player is becoimg more and more popular, which includes standared DVD player like Sony, Samsung, Panasonic, etc and portable DVD player like Sylvania 9-Inch SDVD9000B2, Philips PD9012/37 9-Inch LCD Dual Screen, etc. You can choose what you want most DVD player according to your needs such as screen size, sound quality, built-in speakers, etc. But when you play MP4 videos on DVD player, you may encounter the following similar problems: 

“I have made an MP4 video with DVD Creator and need to get it to play on DVD Player. But why when I try to put the MP4 file on the DVD player, it says “the file is not supported yet.“ What should i do?” 

DVD player may play various formats: DVD, CD, MPEG-2, Divx AVI. Though you have many MP4 videos, the sad part is that the DVD player does not support MP4 because MP4 is a format with different decodes. So what is the best solution for this problem, will MP4 played on DVD player nicely? Here we offer two solutions for you. 


Method 1. Burning MP4 to DVD player with five steps

MP4, otherwise known as MPEG-4, is a video format that is most notably used in portable video players such as the iPhone, Android, PSP, etc. However, the format is readily acceptable on most video programs you use on your computer and it is even possible to play the video on a DVD player. The only requirement is that the MP4 be on either a video CD or DVD.

1. Power on your computer and launch the CD/DVD burning software. You need to have the MP4 video on a disk for the CD/DVD player to read it.

2. Decide on if you want to burn CD/DVD. This may all depend on the size of the MP4 video file. If the MP4 video is larger than 700 megabytes you need to go with a DVD (700 megabytes is as much as a CD can hold).

3. Select either video CD/DVD on the menu of the burning software. Click and drag the MP4 video into the main viewing screen of the software, title the disk and click "Burn." The burning process will begin. Depending on the size of the video file, the burning process may take a few minutes.

4. Remove the CD/DVD from the computer once it has finished burning. Power the DVD player on and insert the disk into the drive. Turn on the TV and switch it to the video setting for the DVD player.

5.Wait for the MP4 video to load up on the television screen. Press the "Play" button on the DVD player to begin the playback.

Tips: If the MP4 is not on either a video CD or DVD, even if you have successfully burn MP4 to DVD without converting, you will still encounter issues in playing MP4 on DVD player: Regular standalone DVD players can only read movie DVD's (those are in MPEG-2, and if you view them in Windows Explorer, you see a folder structure with VIDEO_TS, and files like .VOB .IFO and .BUP). Newer DVD players that are DivX-certified can (in addition to the above) read data DVD’s with an AVI file encoded in the DivX codec. Most of the time, you will fail to play MP4 on DVD player unless the DVD players have the "Nero Digital" label on them. 


Method 2. Converting MP4 to DVD player supported formats with three steps

Therefore, in order to play all MP4 videos on DVD player, you need a professional MP4 to DVD video converter to convert MP4 videos to DVD player compatible format like DivX AVI, MPEG-2, MPEG-1. Here is a powerful MP4 to DVD player tool - Pavtube Video Converter to help you. (read review)

Below will introduce the detailed guide on how to use this wonderful tool to successfully convert MP4 to DVD player supported videos for playing MP4 on DVD player nicely. Free download and buy the right version of this best MP4 to DVD player Converter Mac version - Pavtube Video Converter for Mac (read review) according to your computer type.

Free download the MP4 to DVD Player converter Windows version:


Free download the MP4 to DVD Player converter Mac version:


How to Convert MP4 videos to DVD Player friendly format?

(Note here we take windows version as an example, and the Mac version steps are same with the Mac version.)


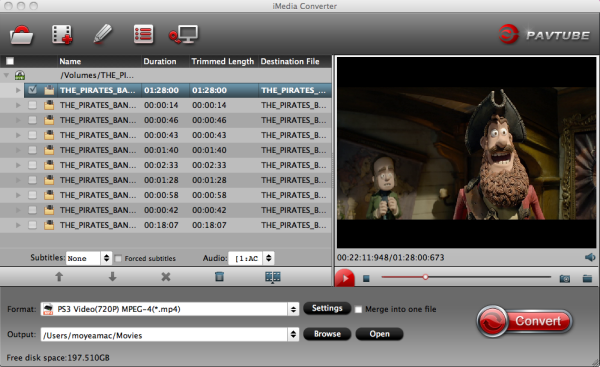
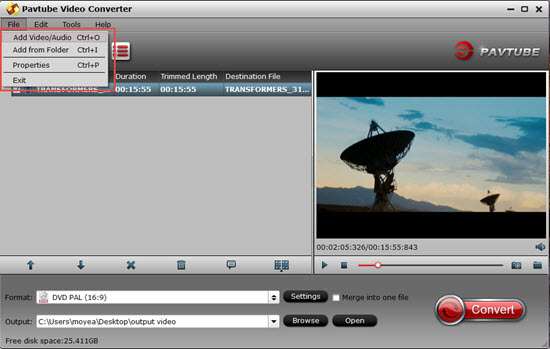
Step 1. Load MP4 files to the Program

Click "Add video" button to add MP4 videos to the program. In case you would want to convert several MP4 files at the same time, just click “ Merge into one file ” to merge them all into one.


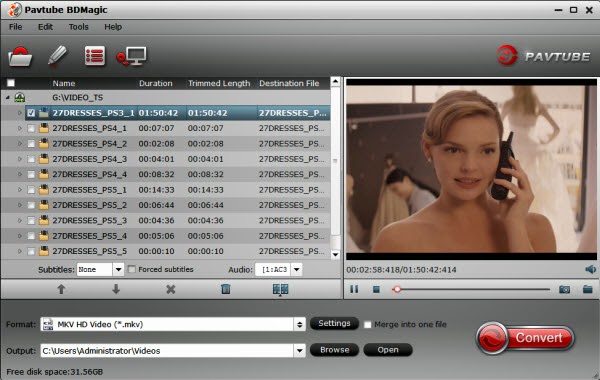
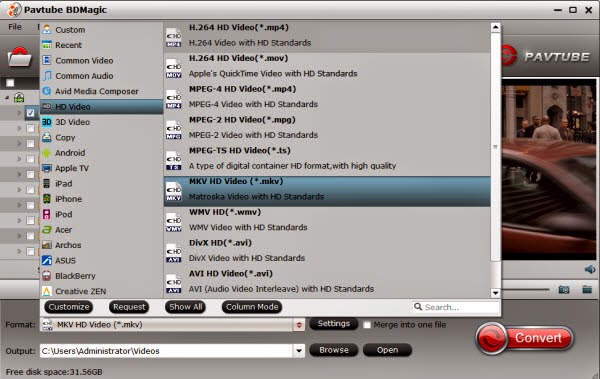
Step 2. Select DVD player friendly MPEG-2/AVI as output format

Click "Format" firstly. Then choose MPEG-2 video(*.mpg) or AVI from "Common video" for playing MP4 on DVD Player without any problems.


Tips: You can also click “ Settings ” to customize output video parameters such as video size, video bitrate, audio channels and so on depending on your needs.

Step 3. Convert MP4 to DVD player supported DivX AVI/MPEG-2

Click the big "Convert" to start MP4 to DVD player. When all the work has been done, please click green arrow button to start converting your MP4 files to MPEG-2 or DivX.

Once it is completed, you can click "Open output directory" to find your output DVD folder file. Afterwards, simply import converted MP4 files to DVD player. At last, you can play MP4 videos on DVD player at ease.


More Information:


  • Play MP4 on Sharp Aquos TV over DLNA/via USB?


  • Convert MTS files to MP4 for Samsung TV


  • The Samsung TV read MP4 movies with subtitles via plex?


  • Best MP4 Video Converter - Re-encode MP4 Files


  • Convert 2D Movie Clips to 3D SBS MP4 for 3D Devices


  • How to Play MP4 Videos in Windows Media Player?


  • 3 Ways to Convert MKV to MP4 for iTunes Playing


  • How To Convert MP4 X264 To AVI To Play On DVD Player?


  • Rip 3D Blu-Ray Disc To 3D SBS MP4 For VR Headsets/3D TVs


  • Best HD PVR Software To Re-Encode PVR Video To MP4/MKV/AVI


  • Make 3D SBS MP4 Video For Homido VR


  • Tips about MP4 playback issue: How to Play MP4 Files

    Did you find an MP4 file on your computer and wonder what program should open it? Maybe someone emailed you an MP4 file but you're not sure how to use it. Perhaps you tried to open the MP4 file but Windows told you that it could not open it. If so, you can check out the solutions here. There are different solutions offered in this article. You can check one out to resolve your MP4 playback problem according to your own preference. 

    Solution 1. Top 3 Free MP4 players - play MP4 in Windows/Mac

    Solution 2. Convert MP4 to Windows/Mac suitable format
      
    Solution 1. Top 3 Free MP4 players - play MP4 in Windows/Mac
      
    Top 1. VLC Player 

     Free MP4 players
        
    VLC is a free and open source cross-platform multimedia player and framework that plays most multimedia files as well as DVDs, Audio CDs, VCDs, and various streaming protocols. Playing MP4 files on VLC is easy. Simply install VLC to your computer, following its default, recommended installation settings for your system, then find an MP4 file on your hard drive and double click to play it. Playing MP4 files on VLC can be even easier if you click the file and drag it into the already-open player. You can also open MP4 files in VLC by clicking “Media > Open File…” in the programs top-most menu; this can accessed by the shortcut key CTRL+O. 
      
    Top 2. SMPlayer

     Free MP4 players

    SMPlayer is a free application that allows you to play most video file types but it does bring complete support for MP4. It doesn't require the installation of any additional codecs as it includes all the necessary codecs right from the beginning. What's more, it also remembers the settings of all files that you play, which is really great.
      
    Top 3. MPC-HC

     Free MP4 players mpchc

    MPC-HC is an extremely light-weight, open source media player for Windows. It supports all common video and audio file formats available for playback. We are 100% spyware free, there are no advertisements or toolbars. MPC-HC can also be used as DVB player. 

    Solution 2. Convert MP4 to Windows/Mac suitable format

    The easiest way to play MP4 on Windows or Mac is to convert MP4 to compatible format. Here, Pavtube Video Converter is my top recommendation. It converts MP4 to any format compatible with Windows Media player or QuickTime player, making you play any video on Mac / Windows seamlessly. It has many built-in optimized presets for various devices and you can convert directly to iPhone 6, Apple iPad 4, iPad mini, Nexus 8, Kindle fire HDX, Samsung Note 4 etc. For Mac users, you can free download the Pavtube Video Converter for Mac

    How to Convert MP4 to Windows / Mac Supported Format
      
    Step 1: Load MP4 video files to this Video Converter

    Download the Pavtube Video Converter on your computer, install and run the program, Click the “add videos” or “Add File folder”. You can choose to import videos or the entire folder by clicking the top left two icons. 

    how to play mp4 files

    Step 2. Choose output profile for your mobile Tablet/Phone or other media player. 

    You can choose any compatible format to your devices. For Samsung, iPad, iPhone, iPod, Apple TV, just choose the corresponding profiles from Samsung/iPad/iPhone/iPod/Apple TV option. 

    Step 3. Customize video specs for Android Devices (Optional). You could also click the “Settings” to adjust the video and audio parameters of output files. In the Video Settings, you can select Encoder, Frame Rate, Resolution (you could define it yourself according to your Android Devices tablet) and Bitrate for your movie. In the Audio Settings, you can select Encoder, Channels, Bitrate and Sample Rate for your movie.
      
    Step 4. Start MP4 Videos Conversion. 

    You can hit the big red “Convert” to start converting MP4 to any format with best video settings for your Devices or computer. After the conversion, click “Open output folder” in the conversion window, or “Open” in main interface to quick locate the converted video. 

    Now, you can easily play your MP4 video files on your PC, Mac or any devices as you want. Enjoy you time and colorful life! 

    Related Articles: 

    Convert Blu-ray to Android Tablet and Phones on PC/Mac
    Top Android DVD Ripper - Converter DVDs to Android Tablet-Phone
    Ripping children’s movie to all iPad Models for use in car

    Can I play commercial DVDs on WD TV Mini Media Player?

    Do you want to play commercial DVDs on WD TV Mini Media Player? If you're interested in doing likewise while having no idea about how-to, keeping reading a brief guide below. Here, you can simply connect WD TV Mini to your TV, plug a USB-connected storage into the player and you are ready to enjoy all your digital media in DVD for smothly playback. 
       
    When we're eagerly awaiting the WD TV HD Media Player rumoured sequel, WD has launched an alternative that supposedly complements both its original and forthcoming players, called the WD TV Mini. As we know, the  WD TV can not support commercial DVDs, so you have to rip them. How to make it possible for you to watch commercial DVDs on your wide screen TV via WD TV Mini Media Player. What you will need is Pavtube DVDAid for WindowsMac, it not only rips, but it encodes too. Below is a step-by-step detailed operating steps:
      
    How to play commercial DVDs on WD TV Mini Media Player? 
       
    Step 1: Load DVD source.

    First of all, Download it and insert your commercial DVD to WD TV Mini Media Player. Now it’s time to import DVDs into the software after launching it. Click “Load files” icon to choose DVD discs for loading.
       
    dvd to wdtv mini media player
       
    Step 2: Select subtitle and audio track

    Click on the pull down menu of “Subtitle” and “Audio” respectively to select your needed subtitle and audio language.
      
    Step 3: Select output format for WD TV Mini Media Player

    Click  on the drop-down list at the end of “Format” to choose an output format for WD TV Mini Media Player. Your selection should be in the range of AVI (Xvid, AVC, MPEG4), MPG/MPEG, VOB/ISO, MP4/MOV (MPEG4), RM or RMVB 8/9/10. Here I select “Commen Video - Xvid AVI - Audio Video Interleaved(Xvid)(*.avi)” as an example:
       
    format for dvd to wdtv mini
     
    Step 4: Click “Settings” button to adjust video and audio parameters

    The user manual tells us that when playback .avi (Xvid) video files, WD TV Mini need to choose the size as “1280*720”, so we need to follow the manual while ripping a DVD.
       
    settings for dvd to wdtv mini
     
    Step 5: Start ripping commercial DVDs .

    Click “Convert” button to start conversion. Once finished, you can get the generated files for WD TV Mini via clicking on “Open” button with ease. Afterwards, just copy the output files to My Passport portable hard drive or other USB drive, and then connect WD TV Mini to your TV, plug your USB drive into the player and you are ready to enjoy the movies ripped from your commercial DVDs. 
      
    Further more information: 

    Media File Formats Supported on the WD TV Mini Media Player (Based on Firmware Version 1.00.60)
    Video -- AVI (Xvid, MPEG1/2/4), MPG/MPEG, VOB, MP4/MOV (MPEG4), RM or RMVB 8/9/10
    RMVB supports up to 1024x576x24, 1024x576x30, or 800x600x30 compressed video resolution.
    MPEG1/2/4 supports up to D1 resolution (720x480 in NTSC, 720x576 in PAL)
    RMVB videos will play on the WD TV Mini Media Player only. They are not supported on the original WD TV HD Media Player, or the WD TV Live HD Media Player.
    FLV file extensions are NOT supported. You will need to use conversion software to convert them to a supported format. (You can use Pavtube FLV to WD TV converter to slove this problem). 
    Audio -- MP3, WAV/PCM/LPCM, WMA, AAC, FLAC, MKA, OGG, APE
      
    Releated Articles:

    Create AC3 5.1 channel MKV for WD TV from your whole Blu-ray and DVD movies

    Encode Blu-ray to Lossless MKV via Synology 415play on WD TV 2

    Since the advent of WD TV 2 Media player, it has taken the fancy of public. WD TV 2 provides an simple and fast way to play your digital formats on your HD TV. It bridges between your TV set and USB facilities. It support regular video, audio and subtitle formats. So, users can feel free to enjoy a wide variety of most popular videos both from your download files and your camcorder. 

    Nevertheless, with such a multi-functional player, why there are still some complaints and hurdles received from users? It turned out to be that those users meet the video or audio problems. They complained that some rare video formats like Blu-Ray clips you stored on Synology 415play can not be supported by WD TV 2 Media player. They want to rip the blu-ray to mkv with quality lossless. Therefore, this article is intended to help solve the problem. 
      
    In order to play your Blu-ray movies to Lossless MKV via Synology 415play on WD TV 2 Media Player, you need to rip these Blu-ray discs to Lossless MKV for WD TV 2 supported video formats. Here, you need a professional tool:Pavtube ByteCopy. This software is designed to backup music DVDs or other video sources to MKV with all information including chapter markers, audio tracks and subtitle streams included. You can backup your music DVDs to lossless MKV with chapter markers preserved and store them on Synology 415play. Now I will show you how to lossless backup your Blu-ray to via Synology 415play for playback on WD TV 2. Mac version is available here: Pavtube ByteCopy for Mac; well support Mac Mavericks! 

    How to convert Blu-ray to lossless MKV via Synology 415play on WD TV 2 for playback. 

    Software Download: Pavtube ByteCopy. (Windows 2003/XP/Vista/Windows 7/Windows 8/Windows 8.1) 

    Step 1. Run this best Blu-ray to lossless MKV converter and launch it. Click “Load Disc” to import movie titles from Blu-ray with BD drive.
      
    Step 2. Choose MKV format as output, here “Format > Multi-track Video > Lossless/encoded Multi-track MKV (*.mkv)” is recomended for you. 
     
    convert-blu-ray-to-mkv-on-wdtv2

    Step 3. Select audio codec for output. Click “Settings” button on the main interface; you are brought to Multi-task Settings. Here detailed parameters of multiple audio and subtitle tracks are listed and you can change any of them at will. In default system setting, every track is checked for lossless MKV output. If you want to remove one of them, just uncheck it from the list. 
       
    convert-blu-ray-to-mkv-on-wdtv2
       
    Note: If you change audio parameters under “Encode” option, you will get a encoded multi-track MKV file, not lossless multi-track MKV. Recoding Blu-ray to MKV will take a little more time for conversion than lossless output. 
     
    convert-blu-ray-to-mkv-on-wdtv2
     
    Step 4. Backup Blu-ray to lossless MKV to WD TV 2.

    When everything is ready, you can click “Convert” button to start Blu-ray to MKV conversion. Once finished, go to “Open” the generated multitracks MKV. 

    The running process will be finished in a few minutes. After that, you can drag the converted files to your Synology 415play and then connect it to your WD TV 2 Media Player for enjoying. 

    Learn more about ByteCopy guides:
      
    Rip Blu-ray to MKV with AC3 5.1/DTS 5.1 audio toWD TV 
    How to play Blu-ray and DVD movie on WDTV

    Transcode Blu-Ray library to NAS media server for playback on Smart TV

    "I want to make a copy for backup my Blu-ray library to NAS server. And then I will stream them for watching on Smart TV. How to make it?"
       
    Recently, there are lots of wonderful Blu-ray discs has came out. Just like: X-Men, How to Train Your Dragon 2, Godzilla, Transformers, etc. After you viewed in theatre, you may want to collect these discs and store them to your NAS. The aim is to save the time looking for Blu-ray discs from the cardboard, desk or the tons of collections. But, how to transcode Blu-ray library to NAS media server for playback on Smart TV? This article will give my own experience about it and it may provide some reference for you.
     
     Blu-Ray library

    Through Google search, a special writing Blu-ray Ripper review site will show in front of you, you will find no matter from the actual price, or functional contrast, Pavtube BDMagic are very worth buying software. With it, you can fast rip and convert any latest Blu-ray discs to Smart TV friendly format with the original quality. In addition, the top Blu-ray Ripping & Copying software also allows you to backup any Blu-ray and DVD movies to Cloud Storage, Plex Server, E-library Server, etc.

    Now, I will show a simply way: 

    How to transcode Blu-ray movies to NAS server supported MKV format for streaming . 
      
    Step 1. Run this Pavtube BDMagic , load Blu-ray discs, Blu-ray folder, Blu-ray ISO image files. This program will help you analysis ISO files automatically so that there’s no need to run virtual drive to mount ISO image files any more.  
      
    transcode-blu-ray-to-nas-for-smart-tv
       
    Step 2. Click the “Format” menu, here you are suggested to choose “Common Video > MKV(Matroska) Video (*.mkv)”.

    transcode-blu-ray-to-nas-for-smart-tv

    Tip: If you want to backup your blu-ray movies with keeping multiple audio tracks and subtitles, ByteCopy will be you ideal tool. Here take MKV as an example, and follow the easy guide below to rip Blu-ray for Smart TV Streaming with mkv format. Above all, If you choose ByteCopy as your assistant, just select “Lossless/encoded Multi-track MKV(*mkv)” format to output the Blu-ray with keeping multiple audio tracks, multiple subtitles. 

    Step 3: If you like, modify profile settings such as video size, bitrate, frame rate, etc to get optimized video and audio playback. Here you can choose the 

    Step 4: Return to BDMagic main interface, and hit the “Convert” button to start encoding Blu-ray to mkv format. 
      
    Once it finshes, open output folder, locate the created mkv file and you can transform the converted files to NAS media server. Or you can play movies on Smart TV via USB flash drive.

    Stream VOB files from Mac to PS4 with best video/audio quality


    This useful tutorial will tell you the solutions about how to get all kinds of VOB files onto Sony PS4 from Mac for playback smoothly. 
      
    Are you thinking about purchasing Sony PS4? The PS4 system opens the door to an incredible journey through immersive new gaming worlds and a deeply connected gaming community, plus it is also an enjoyable experience to Watching movies with your family. 
      
    If we want to transfer the VOB files with best video/audio quality for PS4, we need to know what’s the PS4 support video/audio formats: 
      
    Learn PS4 supported format:

    Video:

    MP4, H.264, H.263, DivX, XviD, WMV, MPEG-2 

    Audio: 

    MP3, AAC, M4A

    In order to stream VOB files to PS4 for playback, you may have to convert them to PS4 playable format (e.g. H.264/MPEG-4). iMedia Converter for Mac is such an all-in-one solution to rip movie files, convert all kinds of videos to universal video and audio file types with super fast conversion speed and excellent image and sound quality. 
       
    Tips: Pavtube iMedia Converter for Mac it is a Mac Ultimate Converter for PS4 that integrates a blu-ray ripper, a DVD ripper, and also can transfer all kinds of videos just like: MTS/M2TS, MKV, VOB, MOV, TOD, TiVo, etc. 
       
    Now, following three steps to achieve copy VOB files from Mac to PS4. 
      
    Step 1. Install and launch the VOB Converter for PS4, click "Add Video" to load video files like MTS/M2TS, MKV, VOB, MOV, TOD, TiVo, etc or click on "BD/DVD disc" icon to load movie from DVD and Blu-ray source(Disc, folder, ISO). 


    Step 2. Click on "Format" boarder to set output format. Here the recommended format is "PSP/PS3 >> PS3 Video(*.720p) MPEG-4(*.mp4)" format, and you can also select other options.   


    Step 3. Finally click on "Convert" button to start converting VOB files with best format for PS4 streaming and playing. 

    When the conversion finished, you can get the converted files to playback for your PS4 and enjoy it! 
      
    See also: 
    DVD/BD playback on VLCIf you wanna backup then watch most of your Blu ray films in full screen and  converting dvd/bluray movies to a best format that can playable on VLC with full screen, you need read this guide and get out of the embarrassment.

    Watch most of my Blu-ray/DVD Films on VLC in full screen

    If you wanna backup then watch most of your Blu ray films in full screen and  converting dvd/bluray movies to a best format that can playable on VLC with full screen, you need read this guide and get out of the embarrassment. 

    Question: “I just tried to play a Blu-ray disc and VLC says Your input can't be opened: VLC is unable to open the MRL 'dvd://E:\'. Check the log for details. In fact, i just want to backup my dvd/bluray movies to a file format and I can play it on VLC with full screen glory. Anyone can help me? ” 

    So you may look for an easy way to play Blu-ray discs or DVD movies on Windows. So, how to find it? How to backup these movies on VLC in full screen? you can Googling several review sites and tried some free trail from top software and choose a good one. 

    “Not so much the feature that made me choose over other brand but I read reviews to see which one got better ratings. However, the feature that I stated in number one was paramount. So i choose Pavtube. ”

    Well, this is one of our customer review and you will get the answer absolutly. 
    And if you met these problems you can choose Pavtube BDMagic. Since you get a free trail of this software, it works very well and you can only rip blu-ray disc/dvd disc to VLC friendly format such as .mkv. 

    Now, step-by-step: How to Watch most of my Blu-ray/DVD Films on VLC in full screen? 

    Step1. Download this BDMagic and Install it and run it as the best blu-ray ripper software.  
      
    Step2. Load your Blu-ray disc or DVD movies to this program, you can choose main movie or chapters to convert, besides you can choose the subtitle or audio at the bottom of the file list. 


    Step3. Choose output format you need, to play Blu-ray movies with VLC player, you can choose MKV, AVI, MP4 or MOV format, they are well supported by VLC media player. Our coustomer took some experimenting to find the best format is the MKV HD. Format. You can have a try. 


    Step4. Click convert button to start the Blu-ray video conversion. You just need to wait some minutes, when the conversion process finished, you can use VLC media player to play Blu-ray movies in best format. 

    Hope you have fun and enjoy your time with your friends!