Rip Deadpool 4K Blu-ray to PC Losslessly

4K Blu-ray has more strict encryption to decrypt. Many Blu-ray ripping tools in the market can rip normal HD commercial Blu-rays but can't decrypt 4K Blu-ray. Besides, even though you don't have the plan to rip 4K Blu-ray, when you play 4K Blu-ray on Blu-ray Player or PC, you still will meet many issues cause many old Blu-ray Players can't play 4K Blu-ray and no PC drive can read 4K Blu-ray right now. So the release of 4K Deadpool gives the buyers a difficult to stream.


Rip 4K Blu-ray Deadpool


Although there are only few Blu-ray Rippers can rip 4K Blu-ray like the new released 4K Deadpool. That doesn't mean you can't find one to succeed in doing it. After a deep online search, we fortunately discovered one Blu-ray decrypter that can bypass 4K Blu-ray protection and backup 4K Blu-ray Deadpool to PC losslessly.


Pavtube Bytecopy is the most professional Blu-ray ripping tool developed by Pavtube Studio, which is updated frequently to support to decrypt the newest Blu-ray encryption mechanism. Now, it is updated to 4.9.0.0 and supports to crack Blu-ray AACS, BD+, UOP up to MKB v62.2 at 30x ripping speed with the supports of NVIDIA CUDA & AMD APP acceleration technology.


– rip 4K Blu-ray Deadpool to lossless/uncompressed MKV on Windows 10.

– rip 4K Blu-ray Deadpool to MP4/MOV/AVI with multiple subtitle and audio tracks.

– convert Deadpool Blu-ray to SD/HD/4K MP4, MKV, AVI, WMV, FLV, TS, MPEG, etc.

– convert 2D 4K Blu-ray to 3D SBS MKV/MP4 while also convert 3D 4k Blu-ray to 3D SBS MP4 for VR Headsets.

ReadMakeMKV vs ByteCopy | MakeMKV Alternative for macOS Sierra


Download and install ByteCopy: Windows version,    Mac version 

Start to Rip Deadpool 4K Blu-ray on PC


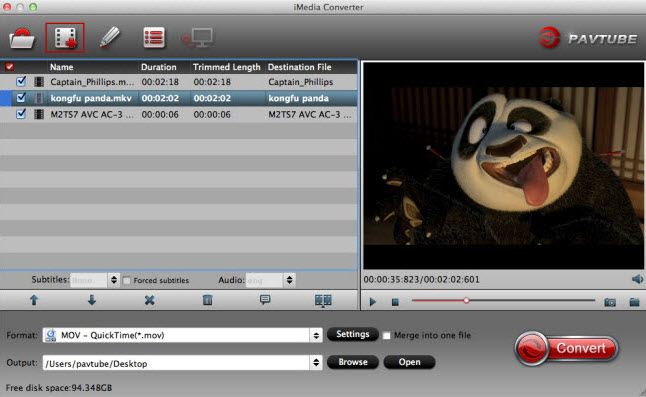
Step 1. Load Deadpool 4k Blu-ray movie 


Insert Blu-ray disc to an external Blu-ray drive, and launch the 4K Blu-ray Ripper for Windows 10; click the disc button to import your Blu-ray disc to the program. Blu-ray folder and ISO image files are supported as well. As you can see, you can preview the loaded Blu-ray files in the right preview window and select Blu-ray audio track/subtitle. 


Load Blu-ray 


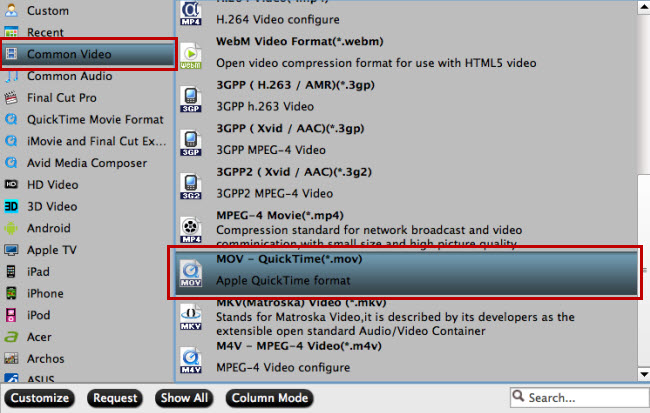
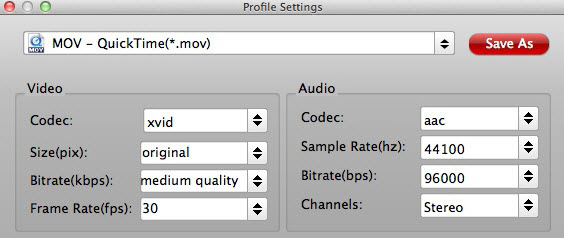
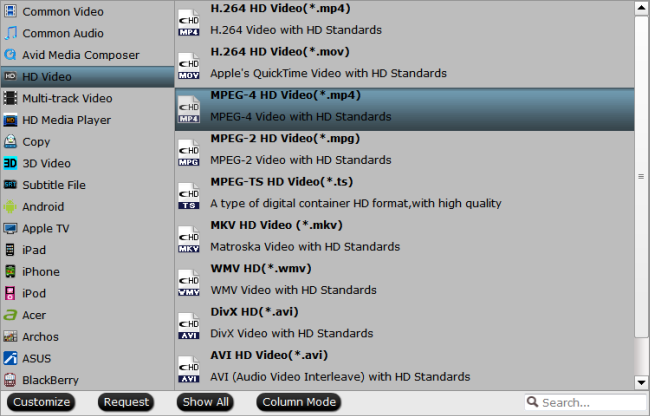
Step 2. Set output format 


Click on “Format” bar to select output format. Here you can choose WMV, MKV, AVI, MPG, MP4, etc as the output video format in the category of “Common Video” to rip Blu-ray to video format on Windows 10. Of course, you also can choose lossless MKV format.


lossless MKV 


Step 3. Start converting 4K Blu-ray Deadpool


Click “Convert” button to start 4K Deadpool Blu-ray conversion on PC. After conversion, click “Open” to find the converted movies for playing, organizing, streaming and sharing. 


Now, you can put 4K Blu-ray rips to USB stick then stream the 4K Blu-ray videos on your Xbox One S, TVs and any other4K Blu-ray Player.

Source: https://media-playback.jimdo.com/2016/12/22/rip-deadpool-4k-blu-ray-on-pc/

Related Articles:

UHD Blu-ray Ripping for PC | Lossless Backup Blu-ray Movies

Play 4K Blu-ray on PS4 Pro | Play 4K Blu-ray on Amazon Fire TV

Play 4K Blu-ray on Xbox One S | Play 4K Blu-ray on Sony 4K Media Player

Upscale 1080P Blu-ray to 4K Blu-ray | Utra HD 4K Blu-ray Disc Finalized

Rip 4K Blu-ray to USB for 4K Ultra TV | Stream 4K Blu-ray via Roku Premiere

Stream 4K Blu-ray to Chromecast Ultra | Rip 4K Blu-ray with Dolby TrueHD/DTS-HD

Remux 4K Blu-ray for 4K Blu-ray Player | Backup 4K Blu-ray to External Hard Drive

Rip 4K Blu-ray to H.265 with Nvidia GPU Acceleration | Best Blu-ray Ripper Comparison

Pavtube 2017 Mother’s Day Up to 78% Off Blu-ray/DVD/Video Tools

The 2017 Mother's day will come in just few days, there are many different ways to celebrate this great day with your Mom. You can either send a delicate card with all your best wishes, prepare a delicious super for her or a bouquet of beautiful flowers to put a smile on her face. But for Mother who are media enthusiasts, gifts such as a Disc Conversion software or video Conversion tool to let her get full access to all her favorite movies, TV shows, music video, etc anywhere at anytime as she like would be your first choice.


Wish to get the best Disc conversion and Video Conversion software with a big deal for your dear mother, just feel free to join Pavtube 2017 Mother's special offer at our Facebook page- Up to 78% off Blu-ray/DVD/Video ripping conversion tools including:
- 50%-55% off discount for Blu-ray/DVD/Video Ripping tool
- Only $9.9 for Video Conversion Tool - 50%-55% off discount for Blu-ray/DVD/Video Ripping tool

Wish to get a digital copy of the movies on the Blu-ray disc or old DVD disc so that your Mother can conveniently view the movies on computer, smartphone, tablets, game consoles, TV, etc without touching the original disc. You can easily achieve that with Pavtube Blu-ray and DVD Ripping software, which can powerfully and automatically bypass the digital copy protection and region code from Blu-ray or DVD disc, so that you can easily make a copy or backup of the data on the disc without any limitation. Detailed discount information are below:


Windows Products:

Pavtube BDMagic?| Original Price: $49 Now: $24.5 | Free Trial?| Buy Now

Pavtube ByteCopy? | Original Price: $42 Now: $21 | Free Trial?| Buy Now

Pavtube DVDAid? | Original Price: $35 Now: $17.5 | Free Trial?| Buy Now


Mac Products:

Pavtube BDMagic for Mac?| Original Price: $49 Now: $24.5 | Free Trial?| Buy Now

Pavtube ByteCopy for Mac?| Original Price: $49 Now: $21 | Free Trial?| Buy Now

Pavtube DVDAid for Mac?| Original Price: $35 Now: $17.5 | Free Trial?| Buy Now


For Mother who are looking for a one stop solution to fix all media types including Blu-ray disc, DVD disc or also digital video entertainment issue, you are highly recommended to save more money get our media conversion tool - Pavtube Video Converter Ultimate for Windows/Mac.


Pavtube Video Converter Ultimate
Original Price: $49 Now: $24.5
Free Trial?| Buy Now


Pavtube iMedia Converter for Mac
Original Price: $49 Now: $24.5
Free Trial?| Buy Now


For professional frame by frame trimming, merging or splitting of your Mother's footage, please switch to Pavtube Media Magic for Windows/Mac.

Pavtube Media Magician for Windows
Original Price: $45 Now: $20.25
Free Trial?| Buy Now


Pavtube Media Magician for Mac
Original Price: $45 Now: $20.25
Free Trial?| Buy Now

- Only $9.9 for Video Conversion Tool

Have captured some great moment of your deal Mother'?daily life, you wish may to do some simple editing or professional post workflow before sharing them with your Mother or people around the world. Never mind, with Pavtube's powerful yet simple to use video conversion tool, you can trim,crop, add watermark, apply effect, change picture color effect, flip, rotate, add external subtitle, etc, or product the best editing format for professional editing software like Premiere Pro CC, Davinci Resolve, Avid Media Composer, Final Cut Pro, etc. Now, save big by picking any of your favorite video conversion tool listed below for only $9.9


Windows Products

Pavtube Video Converter?| Original Price: $35 Now: $9.9 | Free Trial?| Buy Now

Pavtube HD Video Converter?| Original Price: $29 Now: $9.9 | Free Trial?| Buy Now

Pavtube MXF Converter?| Original Price: $29 Now: $9.9 | Free Trial?| Buy Now

Pavtube MXF MultiMixer?| Original Price: $45 Now: $9.9 | Free Trial?| Buy Now

Pavtube MTS/M2TS Converter?| Original Price: $29 Now: $9.9 | Free Trial?| Buy Now

Pavtube MKV Converter?| Original Price: $29 Now: $9.9 | Free Trial?| Buy Now

Pavtube FLV/F4V Converter?| Original Price: $29 Now: $9.9 | Free Trial?| Buy Now

Pavtube DVD Creator?| Original Price: $9.9 Now: $17.5 | Free Trial?| Buy Now


Mac Products

Pavtube Video Converter for Mac?| Original Price: $35 Now: $9.9 | Free Trial?| Buy Now

Pavtube HD Video Converter for Mac?| Original Price: $35 Now: $9.9 | Free Trial?| Buy Now

Pavtube MXF Converter for Mac?| Original Price: $29 Now: $9.9| Free Trial?| Buy Now

Pavtube iMixMXF?| Original Price: $9.9 Now: $17.5 | Free Trial?| Buy Now

Pavtube MTS/M2TS Converter for Mac?| Original Price: $29 Now: $9.9 | Free Trial?| Buy Now

Pavtube MKV Converter for Mac?| Original Price: $29 Now: $9.9 | Free Trial?| Buy Now

Pavtube FLV/F4V Converter for Mac?| Original Price: $29 Now: $9.9 | Free Trial?| Buy Now

Pavtube DVD Creator for Mac?| Original Price: $45 Now: $17.5 | Free Trial?| Buy Now

Magic DVD Ripper vs Pavtube ByteCopy

A collection of DVDs can become quite large over time, and creating digital copies of the DVD collection can help preserve and protect it. Of course, the DVD ripping software you choose can make a difference in the quality and functionality of your backup. Popular DVD Ripping tools have Magic DVD Ripper and Pavtube ByteCopy in the market. But which one is better? Now, let's have a toe-to-toe comparison between Magic DVD Ripper and Pavtube ByteCopy.

Part 1, Magic DVD Ripper and Pavtube ByteCopy Introduction

#1: Magic DVD Ripper

Overview:

Magic DVD Ripper is a very easy and powerful DVD ripping software tool, which can convert DVD to VCD, SVCD, AVI(Xvid, DivX), WMV, MP3, MPEG2, MP4(for iPod, iPad, PSP, PS3 or smartphone etc mp4 player) or backup DVD to hard drive without any loss of quality. And you can enjoy them anytime without DVD discs or burn them to blank DVD or CD discs using burning software.

PROS:

 In addition to its conversion tools, this DVD ripper allows you to back up a disc’s raw files, including ISO and Video TS folders.

CONS:

 The library of customization profiles is tiny compared to the competition.

#2: Pavtube ByteCopy

Overview:

 Pavtube ByteCopy<review> is your best Blu-ray & DVD copying and backing up tool which can backup and convert latest Blu-ray and DVD movies to any other formats like MP4, MOV , M4V, AVI, WMV, MPG, MKV, etc or MP4/MOV with multi-track audios for playback on iOS/Android/Windows Tablets/Phones, HD Media Players (WDTV), editing software (Avid Media Composer, Adobe Premiere, etc.), and more. And other than that, Pavtube ByteCopy is also able to encode Blu-ray movies and DVDs to MKV container format with preserving chapter markers, multiple audio tracks and subtitles and make it possible for you to easily select your needed tracks, subtitles when watching Blu-ray and DVD movies with your media players. creating 3D video is supported by ByteCopy. And the windows version can export single SRT subtitle file.

PROS:

I found little software will keep multiple audio and subtitle tracks when ripping BD/DVD discs until I met Pavtube ByteCopy. Really powerful multi-track preservation function!

CONS:

 It can’t output iso files.

Magic DVD Ripper vs Pavtube ByteCopy

  Pavtube ByteCopy Magic DVD Ripper
Price $42 $39.95
Supported OS

Windows XP/2000/2003/Vista/Windows 7/Windows 8/Windows 10

Windows XP/2000/2003/Vista/Windows 7/Windows 8/Windows 10

Supported Source Blu-ray, DVD DVD
Remove all the restrictions of DVD (CSS, Region, RCE, Sony ARccOS, PuppetLock) Yes Yes
Backup/copy DVD Yes Yes
Trim/crop/merge/rorate/split DVD Yes NO
DVD to Format Conversion
Convert DVD to Xvid, DivX AVI  Yes Yes
Convert DVD to WMV Yes Yes
Convert DVD to MP4 Yes Yes
Convert DVD to MPEG2 Yes Yes
Convert DVD to MP3 Yes Yes
Convert DVD to VCD or SVCD Yes Yes
Convert DVD to lossless/uncompressed MKV Yes NO
Convert DVD to Encoded MP4/MOV with multiple subtitle/audio tracks Yes NO
Convert DVD to TS Yes Yes
Convert DVD to FLAC Yes Yes
Convert DVD to 3D Yes NO


Verdict

From above comparison charts, we can see that Pavtube ByteCopy for Windows/Mac offers more output profiles. Moreover, it also rips 3D/2D Blu-ray disc/BDMV folder/ISO image file while Magic DVD Ripper only can convert DVDs. In addition, it also offers the beneficial DVD copy mode such as 1:1 full disc copy, main movie copy and also a lossless multi-track MKV copy from original DVD movies which is not found on Magic DVD Ripper.

Source:https://media-playback.jimdo.com

Read More Comparison:

AnyDVD vs. Pavtube ByteCopy | Aimersoft DVD Ripper vs. Pavtube ByteCopy

MakeMKV vs. Pavtube ByteCopy | DVDFab vs. Pavtube ByteCopy

Sothink Blu-ray Ripper vs Pavtube ByteCopy | Pavtube BDMagic vs. Pavtube ByteCopy

Jihosoft Video Converter vs Pavtube Video Converter Ultimate

Prism Video Converter vs Pavtube Video Converter Ultimate

Any Video Converter vs Pavtube Video Converter Ultimate

iFunia Video Converter vs Pavtube Video Converter Ultimate

Handbrake 1.0.0 vs. Pavtube Video Converter Ultimate 4.9.1.0

Nvidia HEVC Encoder: MediaCoder vs Pavtube Video Converter Ultimate

HEVC H.265 Encoder for NVIDIA GPU: Cinemartin vs Pavtube

ByteCopy vs. Leawo Blu-ray to MKV Converter

Edit iPhone videos in Windows Movie Maker

You may encounter some weird problems when import and open iPhone videos in Windows Movie Maker like no picture, video preview lag, render slowly or even program crashed. The reason is that iPhone videos are recorded in .MOV format encoded with H.264, which can’t be recognized by Windows Movie Maker. This tutorial will quickly walk you through how to drag and drop iPhone videos including iPhone 7 videos to Windows Movie Maker timeline for editing without hassle.

As is known, the iPhones (including iPhone 7, iPhone 7 Plus, iPhone 6, iPhone 6 Plus, iPhone 5S, iPhone 5C, iPhone 4S, etc.) record videos in .mov format. However, the MOV is not supported natively by Windows Movie Maker. So you need to convert the MOV to Windows Movie Maker compatible format like WMV before editing. ctually, it’s not as difficult as you imagine. What’s need is a just a common video converter like Pavtube Video Converter Ultimate. It supports creating high quality WMV video for your Windows Movie Maker on Windows 10/8/7/XP/Vista, no matter what’s the format of your iPhone video or other source video files.

Hot features of Pavtube Video Converter Ultimate

  • Convert iPhone MOV/MP4 video to Windows Movie Maker supported video with 3 simple steps.
  • Convert DVD, Blu-ray, ISO, MOV, MP4, MKV, H.265, XAVC, MXF, MTS etc to Windows Movie Maker WMV format.
  • Convert iPhone video to PS3, PS4, mobile phones, Android, iPad, iPhone, Apple TV, NLE and other popular end devices.
  • Basic video editing functions: split, merge, trim, crop, add watermark, adjust video effect, edit audio and insert subtitles.
  • United free audio converter and video to image converter.
  • Batch conversion and super fast conversion speed.
  • Easy-to-use iPhone Video Converter with simple clear interface.

Free download iPhone to Windows Movie Maker Video Converter

Now Convert your iPhone video to a editable format for Windows Movie Maker

Step 1. Add iPhone video files

First download and install Pavtube Video Converter Ultimate. When complete, start this program from “Convert” menu or Windows desktop.

Step 2. Set WMV as the output format

Click the format icon on the right to open the format list, and select “WMV” as the output format from Common Video or HD Video. If you want to make changes to the video settings like resolution, bit rate and other settings, click the “Settings” button at bottom.

Step 3. Convert iPhone video to Windows Movie Maker

When everything is ready, click the “Convert” button and all the imported iPhone video files will be converted to WMV format by this iPhone video to Windows Movie Maker Video Converter.

Read More:

Edit 4K Video with Windows Movie Maker | Edit DJI Phantom 4K to Windows Movie Maker 

Edit OBS video in Windows Movie Maker  | Edit MP4 to Windows Movie Maker

Edit MTS/M2TS to Windows Movie Maker | Edit WMV in Windows Movie Maker 

Edit GoPro video in Windows Movie Maker | Edit CamStudio video in Windows Movie Maker

Edit Fraps video in Windows Movie Maker | Edit Android video in Windows Movie Maker

Sony M2TS to Windows Movie Maker | Canon Vixia MTS to Windows Movie Maker

How to Edite iPhone 7 (4K) Video in Adobe Premiere Pro

iPhone 7 video to Adobe Premiere Pro issues

Q1: Having trouble with iphone 7 videos with premiere pro CC

I can’t take my iPhone 7 videos (.mp4) and load them into the timeline. Any suggestions why this is happening?

Q2: iPhone 7 Video – Serious Sync Issues Eliminate Premiere as a tool

I was excited to see how great the video is from the iPhone 7. I have taken one hour 4k videos of lectures that look great. However, when pulled into Premiere (CS5), the sound goes out of sync to the point that it is unusable after about seven minutes. I have checked the original file (.MP4) using QT – it plays perfectly. Indeed, I can trim and split the file using QT and I know that creating a bunch of small videos to link in Premiere would be a solution of sorts.

Why can’t Import iPhone 7 MP4 video into Adobe Premiere Pro?

Can’t import your iPhone 7 MP4 file to Adobe Premiere Pro CS4/CS5/CS3/CS6? The iPhone 7 records in MPEG-4 and outputs its files as .MP4 files (the container). Files are compressed using the h.264 codec (as opposed to AAC or Xvid and DivX usually found in .AVI containers). So the files you are getting out of iPhone 7 are suited to be delivered as is, which is usually not what you want. So sometimes our iPhone 7 MP4 file codec isn’t compatible with Adobe Premiere. To easily solve your problem, you can convert this iPhone 7 MP4 video to other Premiere friendly movie format like MPEG-2, FLV and more (Note: it applies to all kinds of Adobe Premiere including Adobe Premiere Pro, Adobe Premiere Pro CS3/ CS4/ CS5/ CS6).

Solution for Edit iPhone 7 (4k) Video in Adobe Premiere Pro perfectly

To fulfill your task, you can just get Pavtube HD Video Converter for Mac, a powerful video converter, editor. It can easily transcode your iPhone 7 .mp4 videos to Adobe Premiere Pro best editable .mpeg-2 format for ncie editing. Besides, it also can convert other iPhones video like iPhone 6s/6s Plus/5s/5s Plus etc video to Adobe Premiere Pro formats powerfully. In addition to transcoding iPhone 7 .mp4 video to Premiere supported videos with optimized settings while keeping the video quality, the all-in-one and easy-to-use toolkit can convert all other popular SD/HD video formats like AVI, MXF, WMV, MKV, FLV, MTS, VOB, H.265 etc. to Adobe Premiere Pro, iMovie, FCP natively supported video formats on Mac OS X (macOS Sierra, El Capitan Yosemite, Mavericks, Lion included) with fast encoding speed.

For Windows users, please get help from Pavtube HD Video Converter Download the program and learn how to convert iPhone 7 files to Adobe Premiere Pro format.

(Mac version)

 (Windows version)

Steps on converting iPhone 7 MP4 footage to supported MPEG-2 MPG for Adobe Premiere Pro CC

Step 1. Click “Add File” button to import the unsupported iPhone 7 MP4 video file. Or you can also drag your MP4 video directly to the main interface of this MP4 to Premiere Converter.

Step 2. When you come to the output list, we suggest you to drop down the list and find the ‘Adobe Premiere Pro’ column and choose the ‘MPEG-2 MPG’ as the nice one. Or other suitable output format is also available.

Tips: Advanced functions

A. Click the “Edit” button to open the Video Edit window to achieve editing MP4 like trim, crop, image, watermark, effect, subtitles and rotate and etc in the corresponding editing pane.

B. Click the “Setting…” button to open the Advanced Settings window to adjust the output video codec, resolution, bitrates, frame rate, aspect ratio, audio codec, channel, volume and etc in the advanced tab.

As soon as we have finished all the preparation work there, just get back to the main interface to click the ‘Convert’ icon to get the work started. After transferring the files to Adobe Premiere CC as usual, we can edit the recordings in Adobe which shot from iPhone 7 and iPhone 6s/6s Plus/5s/5s Plus. Have a try!

Read More:

Play iPhone 4K video on TV | Play 4K XAVC S on Plex

Edit 4K video on iMovie | 4K Video to Cyberlink PowerDirector

Import Media Files to Adobe Premiere Pro

Import MXF OP-Atom Files to Premiere Pro 

Import Canon XC10 XF-AVC MXF 4K/1080p to Premiere Pro 

Import/Edit Canon XF100 MXF to Adobe Premiere Pro

Import Samsung NX1 H.265 recordings to Adobe Premiere Pro 

Import/Edit Blackmagic 4K Ultra HD Prores with Adobe Premiere Pro CC

Upload 4K Video on YouTube/Facebook/Vimeo

Export 4K from Premiere with Best Settings for YouTube/Vimeo

Compress and Convert 4K video to iPhone 7/iPhone 7 Plus

Does Apple QuickTime Player support h.265 on Mac OS Sierra/El Capitan?

H.265 or High Efficiency Video Coding (HEVC) is the latest generation video compression standard which compresses a video file into smaller package, making it easier to store or transmit. Today is the turn of HEVC. However, many devices and applications like QuickTime player are still need time to support the new codec. Do you have some HEVC/H.265 files saved on your computer, and wonder how to make H.265 files playable in QuickTime player on Mac OS Sierra/El Capitan? You’ve come to the right place.

Since QT player can work with H.264 MP4, MOV, M4V videos well, to get H.265 files playable in QuickTime Player, a quick fix is to convert H.265 to QT Player readable format for playback easily.

One of the best Yosemite/Mavericks H.265 Converter from the market so far is Pavtube iMedia Converter for Mac, which is recentlyupgraded to support H.265 encoding and decoding and it can be taken as a completely professional H.265/HEVC encoder, decoder, player and editor.

With it, you can convert H.265 to QuickTime player friendly H.264 MP4, MOV, M4V video on Mac OS Sierra/El Capitan with quality loss effortlessly. And it is available to customize the output resolutions to any size the users want and edit video file with trim, crop, add watermark, insert subtitles, split, merge and other options before conversion. What’s more, it also supports convert non-H.265 video files to H.265 for storage and playback. Download the program and move on to see how to convert H.265 videos for QuickTime player on Mac OS Sierra/El Capitan .

Download H.265 to QuickTime player converter:

Tutorial: Converting H.265/HEVC to QuickTime player friendly format

Step 1. Add H.265 source

Install and run this best H.265 Video Converter. Click add button to import the H.265 files to the program.

Windows Video to Mac Mini Converter

Step 2. Choose QuickTime Player friendly format

Click the Format menu, select QuickTime Player friendly format as your output video format. There, you can take H.264 MP4, M4V, MOV as your output video format.

Choose Quicktime MOV Format

Tip: In case the default settings do not fit your requirement, you can click “Settings” button and enter “Profile Settings” panel to adjust video size, bit rate, frame rate, sample rate and audio channels.

Adjust QT MOV profile settings

Step 3. Start conversion

Finally click the Convert button to begin encoding H.265 to QuickTime player format.

After the short conversion, go to the output folder and drop the converted files into QuickTime player. Once all this is done, add your converted videos to QuickTime player.

Additional Tip:

Want to find another solution to play H.265(HEVC) videos? Just get the best QuickTime Alternative for Yosemite/Mavericks.

Here is a list of the top 2 options:

1. DivX Player

DivX player is another robust HEVC video file player. It is an award winning software that offers HEVC playback. It offers high-quality playback of movies, TV shows. It supports almost all the popular formats like AVI, DIVX, MKV, MP4 and more. By using its DivX Media Server one can stream music, video and photos to any DLNA-compatible device at home like PS3, XBOX, or Samsung Galaxy line of product. With the Stream To feature in player user can also control which device they can stream their videos to.

2. VLC Media Player

Another player that can play HEVC file is the VLC Media Player, which is a free and open source player and framework. It supports a wide range of multimedia files. It can also play DVDs and various streaming protocols.

Now you can experience the H.265/HEVC videos on your QuickTime Player on Mac OS Sierra/El Capitan  freely!

Continue Reading:

Encode Blu-ray to H.265 MP4 | Play H.265/HEVC on Mac

Play H.265/HEVC to PS4 | Play H.265 on LG TV

Edit H.265/HEVC with FCP X | Edit H.265/HEVC in Premiere Pro

HEVC H.265 Encoder for NVIDIA GPU | Encode H.265 with FFMPEG

Encode HEVC/H.265 MP4 to AVC/H.264 MP4 on Mac

Encode/Decode H.265 video for iPhone/iPad/Apple TV on Mac

Best 10 Prores Converter to Decode/Encode Prores on Windows and Mac

What is Prores

ProRes is a lossy video compression format developed by Apple Inc. for use in post-production that supports up to 5K. It is the successor of the Apple Intermediate Codec and was introduced in 2007 with Final Cut Studio 2.

Prores Converter

Why need to convert Prores to other formats

When finished editing in FCP 7 or FCP X in your timeline, you choose to export as Prores 422 but you may find the file size of the Prores is too large or you might want to convert Prores to another different file format such as MPEG-2 for broadcasting or more friendly playback formats like H.264, MPEG-4.

Why need to encode other formats to Prores

As one of the most popular video formats in professional video production and post-production, the Prores codec is developed by Apple for high-quality and high performance editing in Final Cut Pro X. Although the Prores files are larger, but they render fasters and they have more room, so you can create great looking effects without losing any quality.

To help you to fix Prores encoding and decoding issues, the following article has listed top 5 prores converter for Windows and top 5 prores converter for Mac program for you as a reference.

Top 5 Prores Converter for Windows

Top 5 Prores Converter for Mac

Top 5 Prores Converter for Windows

Pavtube Video Converter Ultimate  Pavtube Video Converter Pavtube HD Video Converter Any Video Converter Ultimate Acrok Video Converter Ultimate
Price $65 $35 $35 $49.95 $59
Pros Decode/ encode Prores with the highest quality Convert all popular SD and HD file formats Specially designed for decoding and encoding HD videos Convert video from and to any file types Fine-tuning video properties such as bitrate, frame rate, resolution and aspect ratio
Cons Lacks the ability to download online video Popular hot devices are missing from its support list Popular hot devices are missing from its support list Convert videos at very low speed buggy and crashes often
Support Prores Formats
Prores 4444
Prores 422 (HQ)
Prores 422
Prores 422 (LT)
Prores 422 (Proxy)
Encode Prores from
AVI
WMV
MP4
MKV
MOV
FLV
H.264
H.265
Blu-ray - - - -
DVD - - - -
Decode Prores to
AVI
WMV
MKV
FLV
VOB
WebM
Device Preset Profile Formats
Convert Prores to Audio Formats
Edit output Video
Trim
Merge & Split
Crop
NVIDIA CUDA/AMD APP Acceleration

Top 5 Prores Converter for Mac

Pavtube iMedia Converter for Mac Pavtube Video Converter for Mac Pavtube HD Video Converter for Mac Any Video Converter Ultimate for Mac Acrok Video Converter for Mac
Price $65 $35 $35 $49.95 $59
Pros Decode/ encode Prores with the highest quality Convert all popular SD and HD file formats Specially designed for decoding and encoding HD videos Convert video from and to any file types Fine-tuning video properties such as bitrate, frame rate, resolution and aspect ratio
Cons Lacks the ability to download online video Popular hot devices are missing from its support list Popular hot devices are missing from its support list Convert videos at very low speed buggy and crashes often
Support Prores Formats
Prores 4444
Prores 422 (HQ)
Prores 422
Prores 422 (LT)
Prores 422 (Proxy)
Encode Prores from
AVI
WMV
MP4
MKV
MOV
FLV
H.264
H.265
AVCHD
MXF
XAVC/XAVC S -
Blu-ray - - - -
DVD - - - -
Decode Prores to
MP4
MOV
M4V
Device Preset Profile Formats
Convert Prores to Audio Formats
Edit output Video
Trim
Merge & Split
Crop

Summary:

The best Prores Converter not only decode Prores to all any other file formats, but also helps to encode common file formats to Prores codec for high performance and high quality video editing in Final Cut Pro 7/X. In addition, You can do extra customization work such as trimming, merging, splitting, cropping without using a third-party video editing tools.

Join Pavtube Black Friday & Cyber Monday Crazy Promotion to enjoy 50% off discounts for Pavtube Video Converter Ultimate for Windows/Mac and only $9.9 for Pavtube HD Video Converter for Windows/Mac and Pavtube Video Converter for Windows/Mac.

Source: Best 10 prores converter for Windows and MAC review.

Related articles:

Best MXF Converters For Windows | Best HD Video Converters for Mac

Best Instagram Video Converter |Best MP4 Video Converter

Best VR Video Converter for MAC | Best Free Mac Video Converter

Best TS Video Converter for MAC | Best 5 Blu-ray Ripper

Top 6 Free iPhone Video/Audio Converter | Best 4K Blu-ray Ripper

 Best Vimeo Video Converter | Best Alternative to DVDShrink

DVDSmith Movie Backup Alternatives and Similar Softwares

DVDSmith Movie Backup is a totally free DVD copier and DVD backup software which can decrypt and remove all kinds of DVD protections, copy DVD to computer hard drive as DVD folder. You can flexibly copy entire DVD disc or copy main movie only. But from some forums, we found many people have issues using DVDSmith Movie Backup. So any program to replace DVDSmith Movie Backup? More excellent, more professional? Yes, just follow the top 2 alternatives to DVDSmith Movie Backup.

Best alternative to DVDSmith Movie Backup is Pavtube ByteCopy Software. We have to say it is the best DVD copier/ripper in the world. What's more, it is also an excellent Blu-ray copier, ripper.

Top 1. DVDSmith Movie Backup Alternative

Powerful Features of Pavtube ByteCopy

Support to decrypt all the latest copy protection Pavtube ByteCopy has the ability to bypass copy and region protection on a commercial DVD dis. In addition, as the Blu-ray disc encryption frequently changes and becomes harder to crack, Pavtube ByteCopy will continuously upgrade to support to circumvent all the latest copy protection on Blu-ray/DVD including AACS, BD+, CSS, region code, RCE, Sony ArccOS, UOPs, Disney x-project DRM, etc.
Two Copy Ways ByteCopy can 1:1 backup DVD without quality loss. With the “Full Disc Copy” function in the top menu bar, you can preserve the DVD and Blu-ray’s original file structure, backup Blu-ray and DVD disc to Mac with one click. Using “Directly Copy” feature, you can backup Blu-ray main movie or “Directly Copy 3D Blu-ray Disc” content in original M2TS/VOB format with original video quality.
Lossless/uncompressed MKV option and multiple soft audio tracks & subtitles. ByteCopy offers a lossless MKV option in output list, which means you’ll get a real uncompressed MKV file keeping DTS 5.1/7.1 surround audio without any quality loss on big screen. It also offers multi-track MP4/MOV/AVI presets with multiple audio streams and removable subtitles, so you can free switch, turn on/off during playback.
Various output presets. Pavtube ByteCopy supports converting DVD to virtually any popular video and audio format so that you can freely watch movies on Apple iOS devices, Android OS devices, HDTV, 3D TVs, PSP, PS4, PS3, Plex, WDTV Live, Roku 4 and more devices. In recent update, ByteCopy can support ripping Blu-ray/DVD movie to H.265/HEVC MP4 with better video quality compared to H.264 MP4 in same profile presets. It even can create 3D SBS video from 2D/3D Blu-ray and DVD on Mac for your VR Headsets such as ZEISS VR One, Oculus Rift CV1, ANTVR Kit, Samsung Gear VR, etc.
Stable in Latest Mac Operating System ByteCopy supports the latest Compatible with Windows 10, Windows 8.1, Windows 8, Windows 7, Windows XP. Mac version supports Mac OS X including MacOS 10.12 macOS Sierra, Mac OS X 10.11.4 El Capitan, Mac OS X 10.10 Yosemite, 10.9 Mavericks, 10.8 Mountain Lion, 10.7 Lion, 10.6 Snow Leopard, 10.5 Leopard.


How to Use Pavtube ByteCopy to Copy DVD/Rip DVD?

Download Windows version or Mac version


Step 1. Load DVD movie

Click “File” in top left corner and follow “Load from disc” to load the DVD movie to DVD Ripper on Windows or Mac.

Step 2. Two ways to copy DVD movie

A. DVD full disc copy

Full disc copy allows you to keep the whole file structure in your DVD disc complete without any quality loss. Click the “Copy the entire disc” button to start DVD full disc copy.

B. Directly copy

If you hate the extras in the DVD, you can try copying DVD main movie only which will leave out any extras for you. Click the format bar to follow “Copy” > “Directly Copy.”

Step 3. Rip DVD to multi-track MKV/MP4/MOV/AVI

Pavtube ByteCopy also allows you to preserve multi-track information when you choose DVD to multi-track MKV/MP4/AVI/MOV. Click the format bar to pick the proper multi-track output format under “Multi-track Video” option.

Step 4: Start backup and copy DVD

If you choose the second or third way to copy DVD movie, you need to hit the “Convert” button in bottom right corner to start DVD main movie copy or DVD to multi-track MKV, MP4, MOV and AVI conversion. When the process is completed, open output folder and find the ripped DVD file. 

Finally, you can enjoy your DVD movies on computer as you like without hassle. 

Top 2. DVDSmith Movie Backup Alternative

Free DVDAid offers every user the opportunity to rip, encode and edit DVD to almost any video and audio format freely. Without extra payment, you could own a freeware to assist with DVD to video/audio transition which enables you to watch DVDs on other multimedia players without limitation. Plus, with the built-in video editor, Free DVDAid is considered to be a easily handled video editing tool with the ability of trimming, cropping, splitting, merging, adding subtitle file, etc.

  • A 100% Free and Easy way to rip your DVD Movies for Personal Use
  • Support DVD disc, DVD VIDEO_TS folder, and DVD IFO/ISO
  • Rip DVD to AVI, MKV, MOV, M4A, AAC… around 70 video and audio formats
  • Fast conversion speed with the NVIDIA CUDA technology and AMD ® Accelerated Parallel Processing (APP)
  • Customize DVD content with built-in video editor

You can go to learn how to use Free DVDAid software.

Source: techmovieshare.blogspot.com

Related Articles:

Format Factory Alternative | Camtasia Studio Alternative | Handbrake Alternative | MakeMKV Alternative | Super Converter Alternative

MPEG StreamClip Alternative | Superior iMovie Alternative | QuickTime Alternative | iDVD Alternative | Wondershare Alternative |RipIt Alternative

Best MediaCoder Nvidia H.265 Encoder Alternatives | Adobe Flash PlayerAlternative | Freemake Video Converter for mac Alternative | Flip4Mac Alternative

DVD Rippers Review | Pavtube ByteCopy Review | Video Converters for PC Review | H.265/HEVC video decoder Review | 4K Blu-ray Ripper Review

Best VR Movies Review | DJI Phantom 4 Pro+ Review | DJI Mavic Pro Review | Instagram Video Converter Review | Microsoft Surface Review

4K Video Editor Review | Pavtube iMedia Converter Review | Blu-ray to QuickTime Review | Customer Review for Pavtube Media Magician


Use NVIDIA CUDA Accleration to Rip 4K Blu-ray to H.265 for Xbox One S

If you have a new (and probably quite expensive) 4K HDR TV, then 4K video is amazing — it looks incredible. But to watch a 4K Blu-ray, you need a 4K Blu-ray player, which can set you back quite a few hundred dollars more than regular Blu-ray. If you do want to make that investment, though, the cheapest 4K Blu-ray player actually does a lot more than just play movies. You can buy a 4K-toting Xbox One S for as little as $349, a full $200 cheaper than the least expensive Blu-ray player today.


In addition, if you want to protect your expensive 4K Blu-ray disc, you can rip 4K Blu-ray to HEVC 4K video for Xbox One S playback via Plex, NAS or via USB hard disc. Since HEVC encoding is CPU heavy. You'd better get a Blu-ray Ripping tool that supports NVIDIA CUDA HEVC encoding hardware acceleration.


Pavtube ByteCopy would help you easily rip and convert 4K Blu-ray disc to 4K video so that you could play 4K Blu-ray on Xbox One S as you like.It would be your best choice to rip and convert 4K Blu-ray to Xbox One S videos. This 4K Blu-ray ripper software would rip and convert 4K Blu-ray disc to 4K MP4/MKV video without any quality loss. With it, you have no difficulty to play 4K Blu-ray disc on Xbox One S.


What's more, Pavtube ByteCopy can rip 4K Blu-ray to HEVC MKV with up to 30x times ripping speed utilizing the most advanced hardware acceleration NVIDIA CUDA & AMD APP by H.264/H.265 codec, which can give users video transcoding speed than before. >> Pavtube ByteCopy review.


 Hot Search:

H.264, MP4, MOV, AVI, MKV, FLV to H.265 | 4K H.265 to Android Phone | H.265 on my LG TV | H.265 to YouTuBe

Samsung NX1 H.265 videos to H.265 or H.264 MP4 | H.265/HEVC to WD TV HD/Live/Mini Media Player


How to Rip 4K Blu-ray to H.265 Utilizing CUDA for Xbox One S

Step 1. Load 4K Blu-ray movies


Install and launch the best 4K Blu-ray to H.265 Converter program. Insert your Blu-ray disc into your BD drive, and click “Load from disc” icon to load your 4k Blu-ray movies and DVD discs. You can also import movies files from Blu-ray folder, ISO and DVD folder and DVD ISO/IFO.


Learn: ByteCopy Joined H.265 NVIDIA to 30X Realtime 4K H.265 Encoding


load Blu-ray


Step 2: Set output format

Click “Format”, and follow “HD Video” > “H.264 HD Video (*.mp4).” as the best output video format for Xbox One S 500G/2TB/1TB. Or you can choose " Zune/Xbox 360 Device >> Xbox 360 Video - Windows Media Video(*.wmv)" as the compatible MP4 preset with best video quality. Then click “Settings” on the interface to adjust video codec to H.265. Or you can directly choose H.265 MP4.


h.265 MP4

Step 3. Utilizing Nvidia GPU Hardware Acceleration In ByteCopy


Now, move your cursor to “Tools” button on the top of the main interface to choose“Options”. Then you can enable GPU Encode acceleration. You need to check if your graphic card supports CUDA acceleration from here


Step 3: Start to convert 4k Blu-ray to XBox One S

Hit "Convert" on bottom-right corner to start conversion. When the process is over, you can find the converted files by clicking the "Open output folder".


Now, you are free to enjoy 4K Blu-ray rips on Xbox One S.


Related Articles:

FCP X Guides: Import SD/HD/4K Video to Final Cut Pro X

Final Cut Pro X uses QuickTime technology; almost any QuickTime-compatible file format can be imported and exported. This allows you to import files created in video editing, motion graphics, and photo editing applications. QuickTime compatible file formats include AIFF, MP3, MPEG, WAVE, JPEG, TIFF, etc. A QuickTime movie file uses a .mov file extension. And it is also compatible with MP4, M4V, and QT formats. And as we can see, Final Cut Pro X does not support the video formats mentioned in the title, which are AVI, WMV, RM, MKV, and MPG. Then how to edit those videos in Final Cut Pro X? We could use Pavtube iMedia Converter for Mac to convert the files to compatible formats. Whether you’re new to Final Cut Pro X or just looking to pick up some tips, you can get up to speed quickly by viewing this tutorials. Here are all of handy tips/tricks/FAQ to turbocharge your FCP X entertainment experience.


Final Cut Pro X media formats and workflow:


Best Editing Formats for Final Cut Pro X

Ingest and Import AVCHD to Final Cut Pro

Import footages/videos/projects into Final Cut Pro X

FCP X: Native vs. Optimize vs. Proxy Media

As more and more video camera manufacturers abandon tape-based conventional recording, smaller, more powerful video cameras have evolved, recording increasingly vast amounts of data. With FCP X, Apple shifts its flagship video editor’s emphasis to tapeless, metadata-based shooting and production techniques that accommodate this emerging data-centric workflow. People use digital recording devices to take notes and dictate letters, memos,videos and other correspondence to assistants for transcribing. The development of digital recording recorders has been significantly influenced by the previous generations of dictating equipment from IBM, Dictaphone and other manufacturers. But today’s electronic digital recorders have moved far beyond mere dictation into the world of high-quality recording. When you start to edit your recording files on FCPX,However, there are still some incompatible formats that cannot be imported to FCPX, such like some 4K videos or high definition XAVC videos, etc. So here're some guides for importing camera files into FCPX.


2K/4K Camera Footage to FCP (X/7/6) Solutions


Canon 5D Mark IV 4K MOV to FCP X

Canon XC10 XF-AVC MXF to FCP X

Canon C300 MXF to FCP X

Sony PMW-F55/F5 XAVC files to FCPro X

Sony PXW-X70 XAVC (.mxf) files to FCP X

Sony PXW-Z100 XAVC Videos Compatible with FCP X 

Sony NEX-VG900 AVCHD files to FCP X 

Sony FDR-AXP33 XAVC S MP4 to ProRes MOV for FCP X

Panasonic HC-VX870 AVCHD MTS to FCP X

DJI Mavic Pro 4K video to FCP X

Blackmagic Production Camera 4K Videos to FCP X/7/6


SD/HD Camera Footage to FCP (X/7/6) Solutions


Canon 100D 1080p MOV to FCP X | Canon XF305 MXF to FCP X

Canon XA20 MTS/MP4 to FCP | Canon Rebel t3i (EOS 600D) Footages to FCP X

Canon 6D Footages to FCP X | Canon EOS 700D/Rebel T5i footages to FCP X

Sony PMW-400 XAVC to FCP X | Sony Alpha NEX Cameras MTS to FCP X

Sony HDR CX170 Footages to FCP X | Sony XDCAM camcorder Footages to FCP X

Nikon D7000 MOV Recordings to FCP | Humax recording 1080p videos to FCP

Panasonic TM900 MTS Videos to FCP X | Panasonic MXF Footages to FCPX

Canon/Nikon/Sony/Panasonic/Pentax/Olympus/Fujifilm SLR camera video to FCP X 


If you happen to own some incompatible file formats such as VOB, FLV, MKV, H.265/HEVC, OGG, VC-1/WMV, VP8, VP9, MVC, Real Video, MPEG-1, MPEG-2, etc, you can easily load them into FCP X with the best editing workflow by Pavtube iMedia Converter for Mac , which can professionally generate FCP X best in different file types according to your own needs. Here're some information for you to convert these unsupported formats well.


Videos to FCP (X/7/6) Solutions


Edit 4K Video in FCP X | Edit HD Videos in FCP 7 | Edit H.264 in FCP | Edit H.265/HEVC in FCP X

Edit TS Video in FCP X | Edit M2T video in FCP X | Edit DVD in FCP | Edit VOB Files in Final Cut Pro (X/7/6)

| Edit MP4 in FCP X | Edit MOV in FCP X | Edit AVI in FCP X | Edit MPG in Final Cut Pro X | Edit Youtube Videos in FCP X

Edit ISO image in FCP X | Edit Blu-ray in FCP | Edit MKV in Final Cut ProX | Edit FLV in Final Cut Pro (X/7/6)


The FCPX supported export the following formats as Apple ProRes (all versions),AVC-Intra Class 50/100/200.,DV (including DVCAM, DVCPRO, and DVCPRO50),DVCPRO HD,H.264.,HDV,MPEG IMX (D-10),Uncompressed 10-bit 4:2:2,etc. But when the output format doesn't support you freely play that cause you have to convert the output files to meet the demand. There are some information beside here.


Export FCP footage Solutions


Export FCP to HD Video | Post FCP Project on YouTube/Vimeo

Export FCP to MP4 | Export FCP to Avid | Burn FCP projects to DVD


Other FCP (X/7/6) Tips


The Correct Way to Ingest and Import AVCHD to Final Cut Pro 7

Import and edit HD videos in Final Cut Pro smoothly


The Final Cut Pro X should now be available for download, If you crash into these troble using FCPX that you can try the best tool(Pavtube iMedia Converter for Mac ) to convert your files before editting or sharing. there are many advantages trying use our software.


100% Shop Securely
We value your privacy and protect your financial/personal info with advanced encryption and advanced fraud protection.


Support Service
Knowledgeable representatives available to assist you through instant live chat and email response within 24 hours.


Money-back Guarantee
All of our products come with a 30 Day Money Back Guarantee.


Lifetime Free Update
Regular updates provided for registered users without extra charge for lifetime.


Trusted by Millions
We currently serve more than 30,000,000 customers.


Contact us:

support@pavtube.com
macsupport@pavtube.com

Community:

Facebook

Twitter

Google+