Ripping Blu-Ray With a Custom Crop Settings

Summary: The guide about the Pavtube Video Converter Ultimate let’s you crop letterboxed Blu-ray movies and keep original aspect ratio . 

There will undoubtedly be times when you need to crop your videos while ripping Blu-rays. For example, when your Blu-ray movies have some black bars on top and bottom or you want to crop videos with large dimensions to fit the small screen of devices. Here is the best guide. 

VIDEO CROP VIDEO CONVERTER– PAVTUBE VIDEO CONVERTER ULTIMATE

- Backup, rip and convert Blu-ray/DVD movies

- Manually crop your video black area into different size.

- Also support MP4, AVI, FLV, WMV, MKV, etc.

- Apply effects, use filters, add titles, music and logo as you like.

- Mac users please use Pavtube iMedia Converter for Mac.


  Halloween Promotion Save:50% )

HOW TO CROP BLU-RAY MOVIES WHEN RIPPING? 

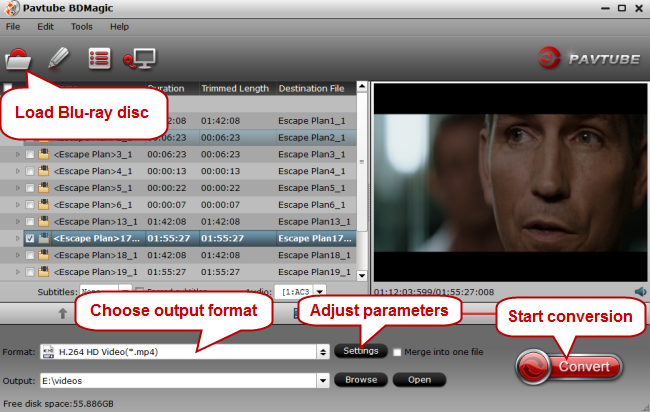
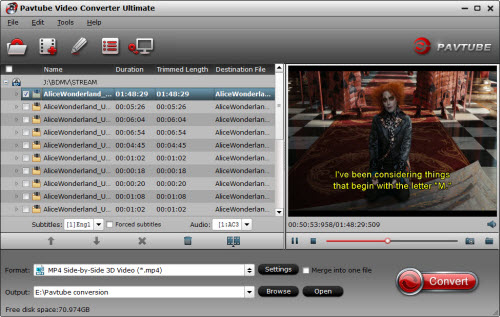
Step 1: Import Blu-ray to crop 

You can either click "File" on the primary windows and select files from your computer. You can choose "Forced Subtitle" to rip Blu-ray. 
 

Step 2: Crop Blu-ray 

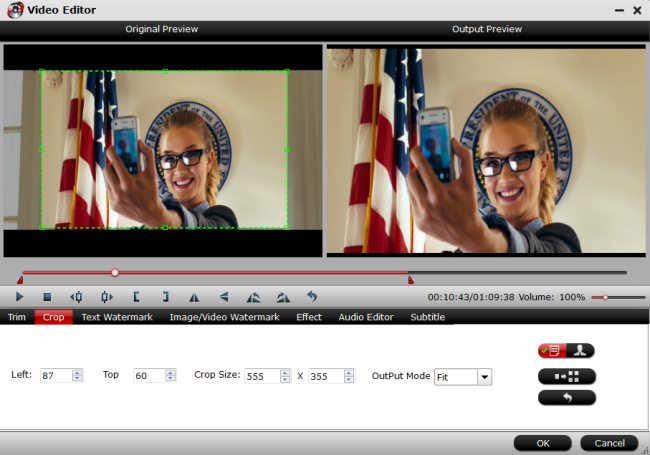
Let’s see how to get rid of the black edges. First, you select a chapter, and click “Edit” to enter the Video Editor. Here you see the Original Preview and Output Preview area. Get rid of the black edges: simply move your mouse cursor to drag and adjust the green frame to desired position to remove the black bar. 
 

Step 3: Choose output format 

Click the Format bar, and choose a desired format in “Common Video” group. HD Video formats (1280*720, 1920*1080) are not recommended for common DVD (720*480 for NTSC, 720*576 for PAL). Here I select H.264 Video (*.mp4) in “Common Video” as output format. 


Step 4. Start copying cropped Blu-ray to hard drive. 

When back to the interface, click the “Convert” button to start cropping and converting Blu-ray movie to hard drive. After conversion completes, click “Open” to find converted movie. 

Blu-ray Cropping Tips: 

1. It's always a good idea to preview your video before you export them to your hard drive. Make sure the video has not been cropped too much. 

2. Make sure the aspect ratio of the cropped video is the same with that of the selected output format. 

3. Note that the quality of cropped video depends on the chosen output format to some extent. For example, you have selected small dimensions, but output as large dimensions of the video, the quality would not be good. In such case, smaller output dimensions are preferred. 

Related Articles: 

Source: http://multimediatips.jimdo.com/2016/08/03/rip-crop-blu-ray/ 

Ripping DVD With Easily and Smoothly

Summary: Do you want to ripping/coping DVDs? Do you think your DVD ripping/coping speed is too low? Do you want to coping/ripping DVD quickly? Here is the tips for quick DVD copies. 
Most of us have very busy and fast-paced lives andwe get impatient when the world is not moving at our speed. One thing that easily makes us upset is the slow DVD copying, which may take you 3 hours and it is impossible for you to wait all the time in front of the computer. So how can you quickly copy DVD while maintaining optimal quality? Here are some tips to help you create a quick DVD copy so you can move on to the rest of your day. TIPS FOR COPYING DVD QUICKLY 

Computer Hardware 

Having updated computer hardware will greatly increase your overall DVD copy time. The DVD drive installed in your computer tower, along with the processor and the memory are all huge players in speeding up or slowing down your copies. DVD drives play a major role because different DVD drives offer varying speeds. You will want to select a drive that offers the best possible speed for reading DVDs. 

In addition to the DVD drive, the processor also heavily effects the overall copy time because it determines the speed at which your computer can process information. The faster the processor, the quicker your computer can read applications and provide results. The available memory allows your computer to take in information. If the memory is full, your computer will not be able to process any information because it will have nowhere to store it. These are three of the largest aspects to obtaining the quickest DVD copy time. 

Multitasking 

A large part of getting more done in less time is the age-old art of multitasking. Chances are that if you want to copy a DVD quickly, there are additional items on your daily to-do list that need to be done. However, you should not use your computer for other tasks while trying to burn DVD copies in a hurry. 

While computers are capable of running a number of applications at a single time, it doesn't always mean that the applications are running as fast or as well as they could if they were the only application running. Shut down your apps and let your DVD copy software do its job. You will notice a drop in the estimated completion time, and you will have fewer errors in the process. 

Disc Quality 

If you try to copy a DVD that has been scratched or has gotten dirty, expect the overall copy process to take longer. Your will need to bypass error messages to move forward with your copies, and some applications may restart the copy or seize copying because they cannot read the disc. While there is little that you can do for a scratched DVD, some DVD copy applications are designed to mend and copy scratched DVDs. You can and should make sure that your DVDs are clean before inserting them into your computer for a copy. Clean your DVDs carefully so that you don't scratch them in the process. 

DVD Copy Software 

Last but not least, selecting the best DVD copy software is important for faster DVD copies. While the applications do not play as large of a role as the hardware, choosing the right software can assist in or deter from a quicker copy. If you plan to copy a majority of commercial DVDs either to watch in a different format or just to have as a backup make sure that you select the application that has little to no restrictions on copying commercial DVDs. The restrictions could potentially add more time to your copies, and some applications won't allow you to make copies of encrypted DVDs at all. Learn >> DVD Copier Software vs DVD Ripper Software 

RECOMMENDED FAST DVD COPY TOOL 

Pavtube ByteCopy is the right software I've found so far to save you a significant amount of time. Scroll down for more detailed info.

6× faster converting speed, rip DVD titles in batch. With multithreading technology and multi-core processing, the fastest DVD ripper, ByteCopy is fast in loading DVDs, and rips DVDs in a matter of a few minutes with no freezing.

Rip encrypted DVD movies without any hassle. One impressive feature embraced by the fastest DVD ripper program is its ability to rip copy protected DVDs fast from Paramount, Diseny, Pixar, Dreamworks, Warner Bros, etc. It bypasses any DVD protection technology automatically, be it the newest Disney DRM, region code (1-6), CSS, UOPs, RCE, etc. The fastest DVD copy software can handle damaged DVDs without stuttering, as well.

1:1 rip DVDs with unchanged video quality. You'll be always able to get awesome output quality. You don't have to sacrifice any quality with the fastest DVD ripping tool. High Quality Engine embedded into the the best quickest DVD ripper keeps speed and quality in good balance. The interface is clean, making it deadly easy to rip movies on DVDs.


HOW TO RIP DVDS WITH THE FASTEST DVD COPIER SOFTWARE? 


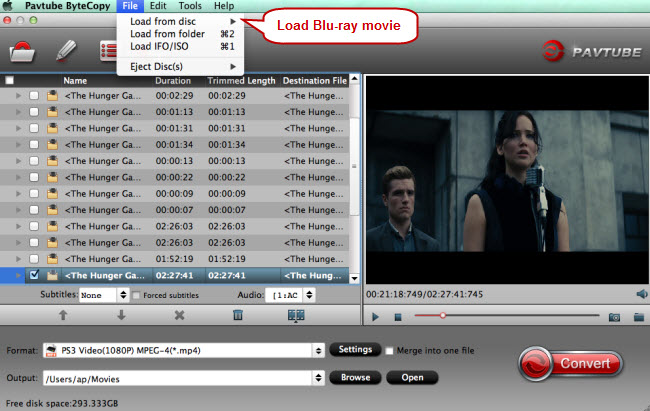
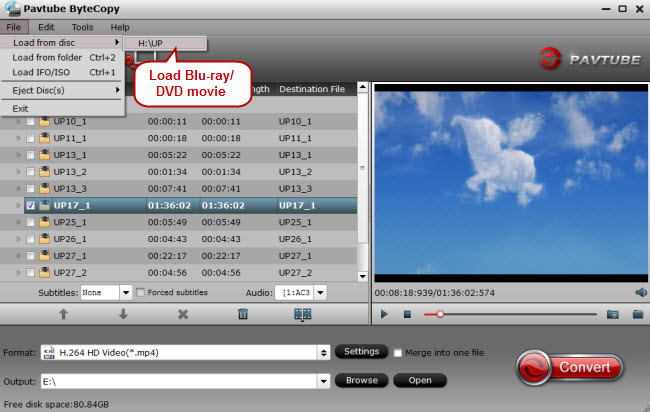
1: Download and install the DVD Ripper abd run it. Insert DVD to computer drive, click "Load from Disc" icon to load the DVD. 

2. Choose output format. The fastest DVD converter enables you to rip and convert DVD to lossless MKV and multi-track MP4, AVI, MOV, etc. digital video format, copy DVD to iPhone, iPad, Samsung, Android etc. Mobile devices, or main title copy, full title copy. 

3. Click "Browse" button to select a destination folder to save the DVD copy file. Make sure the space is larger than that of the file. 

4 Click "Convert" button to start to copy DVD with the fastest ripper. 

By implementing these tips for quick DVD copies, you should find that your DVD copy time has dropped and you are able to get more done in less time. If you find yourself copying DVDs often, we recommend updating your computer hardware and spending the money for a reliable DVD copy application. Don't forget to make sure that your DVDs are clean and unscratched, and you will reach optimum copy times. 

Related articles 

Source:http://multimediatips.jimdo.com/2016/08/17/tips-for-copy-dvd-quickly/ 

Convert Blu-rays on Tablet, Server, HDD, Computer on Mac...

Summry: If you hold onto your disc for the maximum rental period almost everywhere,blu-ray disc it's 17 days for movies and 23 days for . Hold onto your disc for longer? 


Before the rental Blu-ray backup guide using Blu-ray copy software, it needs to make clear that not all rippers help to get rental Blu-ray copies. A case in point is the widely known which rips Blu-ray only when it comes to homemade Blu-ray. But the truth is most Blu-rays borrowed from Netflix, Redbox, Amazon, etc are entangled with copy protection or region code restriction, making the Blu-ray rental impossible to copy with generally Blu-ray backup software. 

Source:Blu-ray to NAS Drive / Blu-ray to NAS Storage / Blu-ray to Hard Drive 

From the google search on the internet, we choose high-rank Pavtube ByteCopy for Mac (Windows ) to reach the goal above-mentioned. ByteCopy gives you the best approach to bypass copy protection or remove region code restriction from rented Blu-rayon on Tablet, Server, HDD, Computer. and backup them in four methods: full disc copy, main title copy, rip Blu-ray to lossless MKV with chapter markers and backup Blu-ray to other video formats. With ByteCopy, you can backup and convert rental Blu-ray to virtually any regular formats H.265, M3U8, MP4, MOV, MKV, FLV… to play anywhere with original quality. 


Other Download: 
- Pavtube old official address: http://www.pavtube.cn/bytecopy-mac/ 
- Cnet Download: http://download.cnet.com/Pavtube-ByteCopy/3000-7970_4-76177783.html 

Blu-rays on Tablet, Server, HDD, Computer Effortlessly 

Step 1: Load Rental Blu-ray movies into the program 

Once you run the Rental Blu-ray Ripper, click BD disc button to load Rented Blu-ray from RedBox, NetFlix, Amazon up into the Blu ray ripping program. 


Step 2. Decide Blu-ray Copy Mode 

A. Full Disc Copy Mode: Copy Rental Blu-ray Disc to a full Blu-ray folder containing all the content in original BD. 

B. Directly Copy Mode: Backup Rental Blu-ray Disc to a file with M2TS as filename extension. This mode enables copy movie only from Blu-ray discs, compared with former mode, save time in copying protected Blu-ray Disc and space to store the output M2TS file to make reasonable and practical use. 


Step 3: Choose an output video format 

If you wanna rip Rental Blu-ray to your needed file types, you need specify a format as output format. Click on the dropdown menu of "Format", and then choose your needed one from the multiple output format presets. You can rip Blu-ray to MKV, MP4, MOV, WMV, or rip Blu-ray for playback on iPad, iPhone, PS Vita, Nook HD, Galaxy Tab and more other portable devices you can think of. 

Tip: Click "Settings" button, then you are able to adjust all the settings in the following window to customize the output file quality, including codec, size, bit rate, frame rate, sample rate and audio channel. 

Step 4: Rip and copy Rented Blu-ray from RedBox, NetFlix, Amazon 

Once the above mentioned steps are finished, you can click "Convert" button to copy Rental Blu-ray movie to either the hard drive of your PC, or to your portable devices for enjoying on the go. 

When the copying/ripping task is completed, you can click "Open" button to get the ripped files of Rental Blu-ray movie. Then, you can play, share Rental Blu-ray with your families anywhere you want. 

Related articles 

Source: http://multimediatips.jimdo.com/2016/09/08/save-rented-redbox-blu-ray-permanently/

Convert Blu-ray to 720 x 480 Video

Summary: Standard Blu-ray is 1080p and new 4K Blu-ray has 2160p. Blu-ray resolution is high and that is an advantage but sometimes, you may need to get it reduced to a lower resolution. 

When your display has lower pixel or you want to rip Blu-ray to Gear VR video, you need to reduce the resolution to a lower resolution like DVD 720 x480 vidoe. So how to get the film reduced to 720 x 480 during the ripping process? Read the article to learn the way to convert Blu-ray to 720 x 480 video.

Side-by-side Comparison of Blu ray vs DVD vs 4K Ultra HD


Resolution


Storage


Laser type


Video codecs


Price


Region codes


Availability


DVD


720×480 (480i/480p-US)


4.7GB/8.5GB


650nm (red laser)


MPEG-2


$14.99 to $29.99


8 regions(6 commercial)


Numerous movies in DVD


Blu-ray


1920×1080 (1080p)


25GB/50GB


405nm (blue laser)


MPEG-2
MPEG-4 AVC
SMPTE VC-1


$5 to $10 expensive than DVD


Three region codes


Newer and fewer than DVD


4K UHD


4096x2160 or 3840 x 2160


66 to 100GB


N/A


HEVC and VP9


Free to $99/year subscription


N/A


Limited resources

Steps to Get Video Reduced to 720 x 480 During ripping Blu-ray process 

Step 1: Get Pavtube ByteCopy to rip and compress Blu-ray video.

Pavtube ByteCopy can rip any Blu-ray discs by removing Blu-ray BD+, AACS up to MKB v61 then extract lossless MKV from Blu-ray. It also can convert Blu-ray to MP4/MOV/AVI with multiple subtitle and audio tracks. If you want to watch Blu-ray on VR Headsets, you can convert Blu-ray to 3D MP4, 3D MKV with ByteCopy. In the Blu-ray ripping process, ByteCopy allows you adjust video size to 720 x 480 or 1280 x 720 whatever you want.

Step 2: Click "File" icon like a disc to load source movie from Blu-ray disc or a folder. It will automatically detect the main title to convert.


Step 3: Hit "Format" to open the drop-down list. Choose "H.264 High Profile Video (*.mp4)" format from "Common Video" catelog.


Step 4: Click "Settings" in the main UI to open a new window. Choose 720 x 480 from "Video Size" box.


Step 5: Set output folder with "Browse" button. Then press on "Convert" to start to rip Blu-ray to 720 x 480 video.

When the ripping process ends, just open output folder then you can get the generated 720 x 480 video. With this Blu-ray Ripper, you also can shrink BD 50 to BD 25 in 1080p video.

Related Articles: 
Source:http://formatplayable.jimdo.com/2016/08/30/reduce-blu-ray-to-720-480-video/ 

Top 5 Pirate Blu-ray/DVD Movies, Music or Software

Summary: On the surface, being a pirate might seem like a good deal. All the music and movies you want.

With all the file sharing sites out there, nobody pays for music, movie and software anymore, do they? Many file sharing sites got original Blu-ray/DVD movies/music/software and hacked them then upload them to their sites for people downloading. They get website traffic and advertising contribution to make money. I don't say it that you completely shouldn't download the pirate Blu-ray/DVD movies, music and software to prevent from taking your money. But there are some 5 reasons to make you stop pirating Blu-ray/DVD movies, music and software.5 Reasons You Shouldn't Pirate Blu-ray/DVD Movies, Music or Software

It's Dangerous.

The fact of the matter is that if something sounds too good to be true, it almost certainly is. While the idea of a brand new album available (free!) months before the release date is certainly enticing, it's also likely an outright lie. Pirates often make grand promises about what a given file contains; in fact, they'll arrange it so that whatever you search for, they'll have something available with that title. What many unlucky pirates discover, however, is that instead of the great movie they wanted to watch, they've downloaded a dangerous virus. The resulting damage to their computers can be catastrophic and could end up costing much more than the file they downloaded would have.

It's Illegal.

While some people believe that being a pirate is a victimless crime, the fact of the matter is that businesses lose millions of dollars a year to internet piracy. Copyright infringement is a very serious matter to them, and they are not shy about prosecuting those who rob them. While it may seem paranoid, it's wiser to stay away from illegal downloads rather than risk a potentially devastating lawsuit.

It Drives Prices Up

While the cost of acquiring media has decreased drastically with the advent of the internet, the cost of producing much of this same material remains the same. Companies are forced to spend millions of dollars catching pirates each year, and that ultimately cuts into their profit margins. This in turn forces companies to raise the prices on their products, whether it is movies, music or software. Ultimately, being a pirate only hurts you and all other consumers like you.

It's not supported

This aspect applies more to software than media, but it is also somewhat true of movies and music. If you have trouble installing an application or it damages your system in some way, there is no possibility of getting help for a stolen product. If you acquired the software legitimately, then the developer will help you solve the problem. For instance, if some type of DVD copy software fails to perform as advertised, you can return, replace or modify the product. The same offer does not stand for illegally downloaded material.

It's Hard

The simple truth is that looking for pirated media is a time-consuming and often difficult process. Filtering out the spam and viruses from actual available media is not only dangerous, it's also silly. There are many legitimate sources where you can acquire the same media for a fraction of the effort. Pirates simply opt to ignore websites like iTunes or Amazon, where music can be purchased for a reasonable price with guaranteed quality. Movies and TV shows are easier than ever to get at too, thanks to Netflix and Hulu. What's more, there are a number of perfectly legal DVD copy software applications that you can purchase for a reasonable price. To be an internet pirate is to make your life far more difficult than it has to be.

3 Blu-ray/DVD Copy Tools to Help you Rip Blu-ray/DVD Movies for Personal Use Legally

Software ComparePavtube ByteCopy for (Win/Mac)

Pavtube BDMagic (Win/Mac)

MakeMKV(Win/Mac)

Purchase Benefits

lifetime free upgrade; 30-day money back.
Price: $42

Win: Download Buy

Mac: Download Buy
Price: $49

Win: Download Buy

Mac: Download Buy


Free
Supported Source
Blu-ray Discs,Blu-ray Folder,Blu-ray ISO Image File


DVDs, DVD Folder, DVD IFO File,DVD ISO Image File


Output Formats
MKV


3D MP4/MKV/MOV/AVI


-
H.265,H.264,DivX,XviD


-
MP4, M3U8, AVI,WMV,


-
SWF, F4V, MOV, FLV


-
3GP,VOB, TS, DV,


-
Lossless MKV: with multi-audio tracks/chapter markers


-


Encode MP4/MOV: with multi-audio track


-


-
MP3, AAC, FLAC,OGG


-
WAV, M4A, DTS, AMR,


-
Other Functions
Add SRT subtitle.


-
Merge & Split Video


-
Trim & Crop Video


-
Adjust A/V codec, size,bitrate, frame rate, channel, etc


-
Extract SRT Subtitle


-


-

With these 3 Blu-ray Ripper and DVD Ripper, you can backup your own DVDs and Blu-rays, borrowed ones and online rentals to hard drive so that you can watch wanted movies without needing downloading pirate movies from online.

Related Articles: 

Ripping DVDs to Windows Home Server with Smoothly

Summary:The easiest way to copy DVD to Windows Media Server for devices streaming conveniently.Windows Home Server (WHS) enthusiast. 

Windows Home Server is a central device capable of managing multiple PCs and files across a home network. WHS-specific functionality such as DLNA support and media streaming will be folded into Windows Server Essentials 2012, a product aimed at small businesses and priced starting at $425. Windows Home Server 2011, the current version of WHS, will be available for most most people until 2013, and computer manufacturers can obtain the software to create new devices until 2025. Now, more and more people are getting to use Plex, NAS and other server devices. But there are still many people insisting on Windows Home Server. Many tutorials on Google teach you how to rip DVD to NASDVD to Plex, now, let's instruct you how to copy DVD to Windows Home Server. 


Searching high and low online, I finally got some tips and ticks for getting all DVDs into Windows Home Server. To get DVD collection to Windows Home Server media server, what you need to do is to rip DVD into Windows Home Server Media Server friendly format like MP4, WMV, etc. first. There’s all kinds of different software out there (some free, some not) with a variety of different options. Among them, I found a Pavtube ByteCopy for Windows/Mac and can be taken as a powerful DVD to Windows Home Server converter software to rip copy-protected DVD to Windows Home Server-compatible format with a wink, and even extract MP3, WMA, FLAC, OGG, etc. audio from DVD movies.

What's more, Pavtbe ByteCopy can convert DVD with multiple subtitle and audio tracks in MP4/MOV/AVI format and rip DVD to lossless MKV with all chapter markers.


Other Download:
- Pavtube old official address: http://www.pavtube.cn/bytecopy/
- Cnet Download: http://download.cnet.com/Pavtube-ByteCopy/3000-7970_4-76158512.html How to Copy DVDs to Windows Home Server?

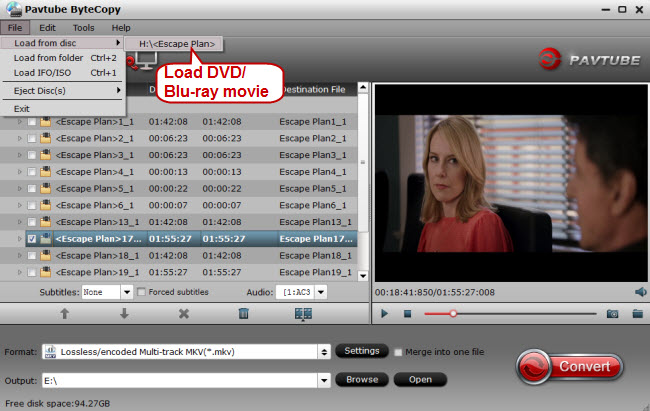
1. Import DVD to Pavtube ByteCopy.

Click "Load file" icon on the top left to load the DVD disc.


Read: Top 5 Reasons to Copy DVDs and Best DVD Copy Software

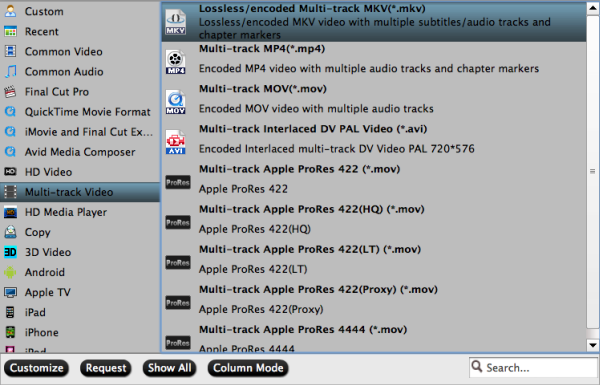
2. Choose Lossless MKV with chapter markers.

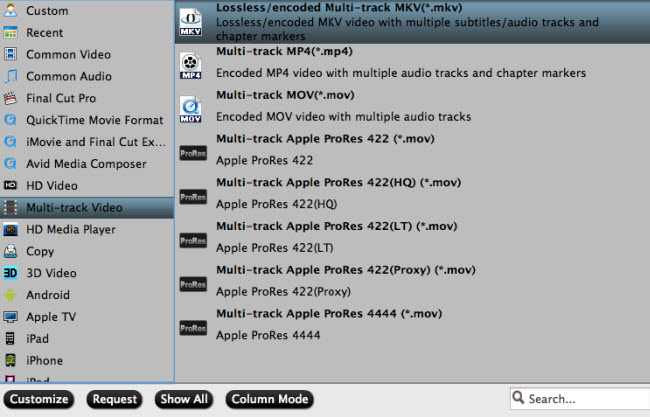
Under "Format" menu, there are lots of video formats. Go to find "Multi-track Video" option and choose "Lossless/encoded multi-track MKV (* mkv)" because it will contain chapter markers in output MKV.Of course, you also can choose multi-track MP4 for WHS.


Tips: 

1. If you want to convert DVD to other video formats or portable devices, just choose the video format you need or select portable devices in the dropdown list.

2. Click "Settings" to enter Multi-track video profile window; switch to "Video" and find the "Encode" box which is unchecked by default, so if you want a lossless MKV copy, do not touch it. The switch to "Audio", check wanted audio track; so does the "Subtitles".


3. Start conversion.

Click big "Convert" button to start DVD to WHS conversion. It won't take much time for conversion and then you will get lossless MKV once completed. Hit "Open" button you will go to location of generated files.

After the conversion, open output folder to locate the files. Then you can transfer the media to WHS for devices streaming. Learn How to Set Up a Home Media Server You Can Access From Any Device

More features in ByteCopy:

* Full Disc Copy can 1:1 backup the whole Blu-ray/DVD disc with original structure including chapter markers.
* Directly Copy will backup 100% intact Blu-ray main movie with all the multiple tracks excluding menu.
* Contain all the features of Blu-ray Ripper: rip and convert latest Blu-ray/DVD to various video formats for playback or editing, edit the video before conversion including trim, crop, effect, etc, add *sst and *ass subtitle into video part and so on.

Good news for you: To save your money, Pavtube Special Offer offers various product bundles, such as:
Related Articles:  Source:http://media-playback.jimdo.com/2016/09/09/copy-dvd-to-windows-home-server/ 

Top Reviews About DVD Storage for Small Places

Summary: Here sharing 5 creative 5 ideas about DVD storage with smaller space to free up some space in your room. Read it and you will find the way you like. 

DVDs are one of those things that has always bugged people when it comes to storage. They seem so slim but as your collection grows your storage space seems to simultaneously shrink. How to organize them to free up some space to collect more DVDs? Any idea about shrink DVD stroage space? Now, this articles is shareing 5 creative ideas about DVD storage for small places. 

5 Perfect DVD Storage Ideas for Small Spaces 

DVD storage idea #1. Store DVD with DVD Sleeves 

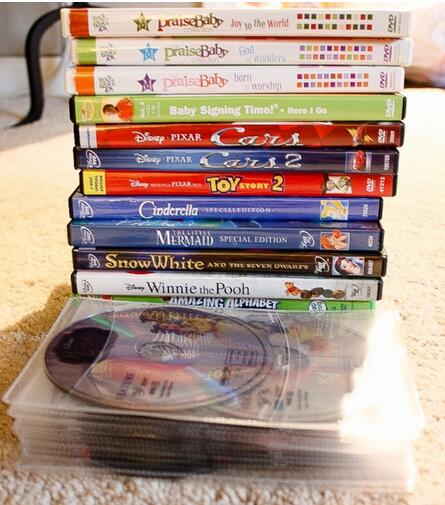
Here’s what I do when we buy a movie. First I pull the DVDs out and put them in a sleeve. There are 2 slots in the sleeve so if there’s a Blue Ray version and a non-Blue Ray version I can keep both of them together. I also keep movies like Cars 1 and Cars 2 together in the same sleeve. Then I pull the paper cover out of the original DVD case and cut it to fit the sleeve. I like to save the front cover of the DVDs because it makes it easier to identify the movies when you’re looking through them.Slide the cover into the sleeve, then slide the DVD sleeve behind it and you’re done! 


DVD storage idea #2. Store DVD on DVD Wall 

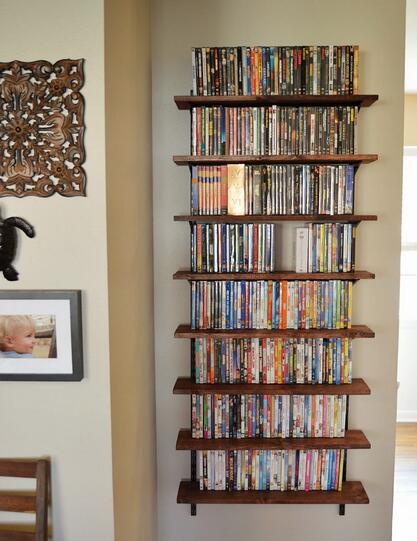
I am absolutely in love with our new DVD wall. We had to clear a closet to make room for our expanding family. Now the coat closet in the living room is actually a coat closet and no longer home to our DVD collection. I haven't decided yet if I am proud or ashamed of how many DVDs we own, but it looks awesome either way! We used shelf brackets from Home Depot, and we used 1x8 wood planks instead of buying the cheap shelves they have in that section of the store. This was a pretty easy project. The most tedious part is staining the wood, but I always feel that way about any project. 


DVD storage idea #3. Store DVD in DVD wallets 

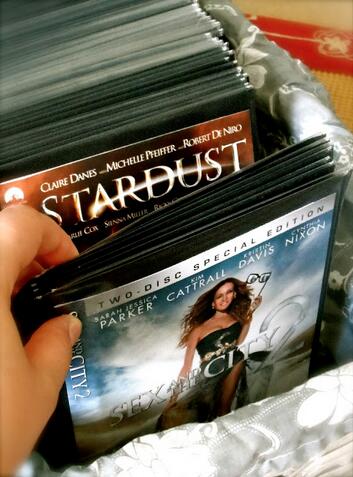
I trawled the internet looking for inspiration and came across some DVD wallets. They were not like the CD storage I had used in the past, but instead handily incorporated the Movie artwork aswell. I found that by using these wallets my whole movie collection fits into a basket! I'm currently searching for a better basket to house them, this one is a bit flimsy but it will do for now. 


DVD storage idea #4. Store DVD under bed 

Trunk beds offer a lot of room for storing stuff. So, why not make use of it to store your DVDs? It can keep quite a lot of DVDs. Put them into the drawer under your bed, and then those bulky DVDs will be out of your sight. Now, it's time to enjoy your small but tidy room. 


Best DVD storage idea. Store DVD content to hard drive, portable storage devices, cloud service, NAS, etc. 

You don't need to allot space to store DVD discs in your small house if you store DVD content to hard drivethumb drivecloud serviceNASexternal hard drive and so on. It is not only the most effective way to save home space, but also an economical and easy way to manage your DVD libraries. And all you need to do is to rip the DVDs to digital files with a DVD ripper. There're many good DVD rippers in the market, some are free, and some are paid. If you have both home-made and commercial DVDs, you're recommended to give Pavtube BDMagica try. 

Learn >> Pavtube BDMagic main features 

How to use BDMagic to Copy DVD to Storage Devices? 

Step 1: Load DVD disc to the software 

Insert your DVD disc into your computer DVD drive, then launch the program, from "File" menu drop-down list, select "Load from disc" to import source DVD disc movies to the program. 


Step 2: Select output format 

Storage device usually supports storing almost all kinds of video formats. However, when linked to a device for playing, the video format should be accepted by the device such as smart TV, computer and tablet. So you are required to figure out the exact input video formats supported by the device you are to play the DVD video with. For portable devices including Android tablets, MP4 is recommended since it has wide compatibility with multiple players, good video quality and small file size. For TV, MPEG format is so far accepted by most brands. You can choose any video format in “Format” bar according to the DVD playback device you will use. 

Step 3: Backup DVD to NAS, flash drive, hard drive, etc 

Carry out the DVD ripping process by hitting the right-bottom convert button to start to copy DVD to various storage devices at ultra fast speed. 

Important tip: 

Since DVD disc is subject to damage in use, you'd better make a digital copy. By doing this, you can keep your precious movie/video safe, carry the content when you're out of home, play the content on computer without disturbing DVD drive and DVD disc, watch them on iPhone, iPad, Android and more. Besides, after having a digital copy, you can choose to ditch space-consuming DVD discs. Obviously, it can be regarded as a good DVD storage idea. 

Related Articles:
Source:http://media-playback.jimdo.com/2016/09/20/dvd-storage-ideas-for-small-space/