2016 Thanksgiving Deals: 50% OFF DVD/Video Converters

2016 Thanksgiving Day is coming. Some of you are probably planning the Thanksgiving menus for your family while some are ready for selecting the best Thanksgiving present for their parents. With great blessing and best wishes, Pavtube Studio also prepared a big gift for their consumer – Thanksgiving Promotion 2016 to celebrate Thanksgiving Day with our friends. Focusing on product quality and customer needs, Pavtube offers up to 50% discount for hot products to reward our customers. Now,let's see the promotion in detail.

Pavtube 2016 Thanksgiving Day Promotion

Index of Pavtube 2016 Thanksgiving Day Promotional Notices

BD/DVD/Video Package Tools | 50% off Video Tools | Bundle Software Big Deal

Pavtube Promote BD/DVD/Video Package Tools in 2016 Thanksgiving Day


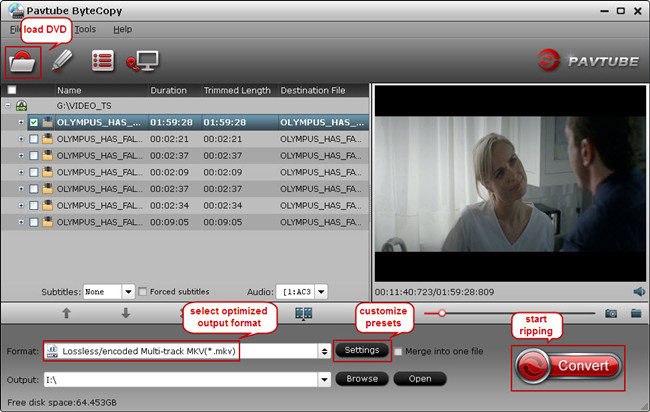
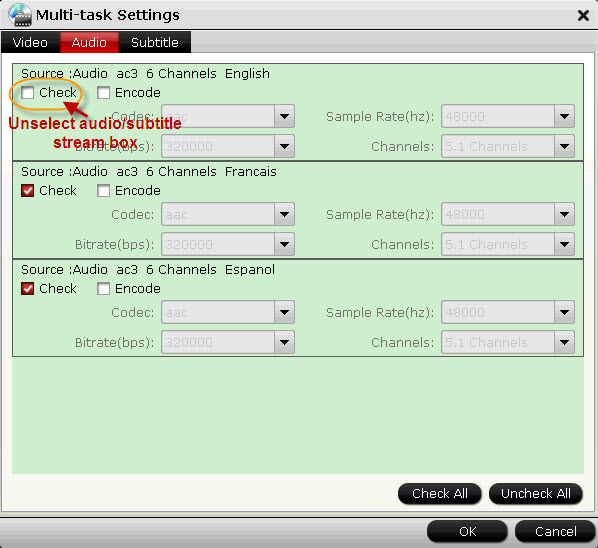
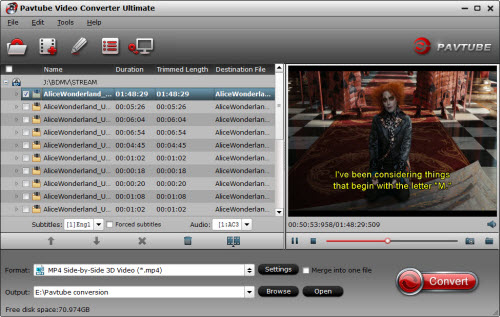
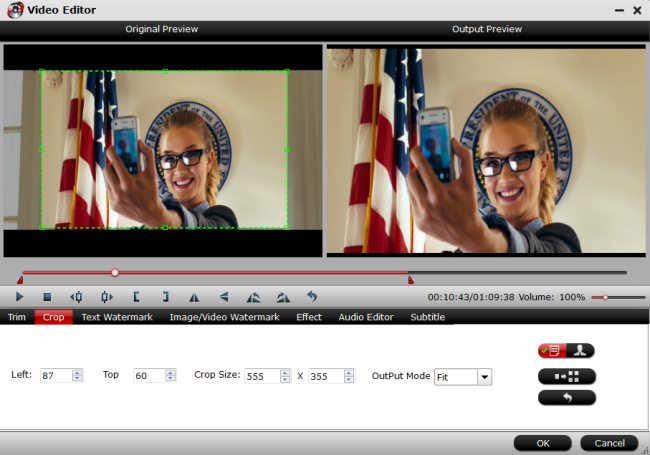
  Pavtube Video Converter Ultimate for Windows /Mac Pavtube DVD Video Converter Ultimate Pavtube BDMagic for Windows /Mac Pavtube DVDAid for Windows /Mac
Discount
HomePage
Reviews
How To
Guides
Purchase

Pavtube 50% off Video Tools in 2016 Thanksgiving Day


Pavtube MXF MultiMixer

  1. Preserve MXF multi tracks and channels
  2. Export MXF to MKV/MOV/MP4 with multi tracks
  3. Transcode MXF for Non-linear Editing Software
  4. Trim/Crop/Merge/Watermark/Deinterlace MXF video
Original Price: $45

Now: $22.5

Free Trial | Buy Now

Pavtube Media Magician for Windows /Mac

  1. Import/Backup/Manage camcorder video
  2. Lossless output AVCHD MTS to MTS or MKV
  3. Frame by frame edit Video on timeline
  4. Output Different formats from same source
  5. Directly Upload Video to YouTube
Original Price: $45

Now: $22.5

Buy Windows | Buy Mac

Pavtube MKV Converter for Windows / Mac

  1. Convert MKV with desired subtitle and tracks
  2. Bundled streaming server app
  3. Ouput MKV to popular video and audio formats
  4. Split/Merge/Crop/Watermark MKV
  5. 6X faster conversion speed
Original Price: $29

Now: $14.5

Buy Windows | Buy Mac

Pavtube FLV/F4V Converter for Windows / Mac

  1. Convert FLV/F4V for Device playback
  2. Design FLV/F4V video with editing tools
  3. Bundled streaming server app
  4. Perfect video audio sync technology
  5. 6X faster conversion speed
Original Price: $29

Now: $14.5

Buy Windows | Buy Mac

Pavtube 2016 Thanksgiving Day Promotion Software Bundles


ByteCopy + Video Converter Ultimate

Original Price: $107

Now: $79.9

Video Converter Ultimate + ChewTune

Original Price: $94

Now: $74.9

ByteCopy + ChewTune

Original Price: $71

Now: $54.9

Video Converter Ultimate + DVD Creator

Original Price: $100

Now: $64.9

BDMagic + DVD Creator

Original Price: $84

Now: $49.9

ByteCopy + DVD Creator

Original Price: $77

Now: $44.9

Pavtube 2016 Thanksgiving Video Software Promotion Bundles


MXF Video Converter for Mac + MTS/M2TS Converter for Mac

Original Price: $58

Now: $29.9


Pavtube iMixMXF + HD Video Converter for Mac

Original Price: $80

Now: $54.9


Convert Blu-ray with 5.1 Surround Sound for Netgear NeoTV

Summary: Netgear NeoTV is the cheapest TV Box but it still can stream 1080p HD video. So here let's teach you how to rip Blu-ray to Netgear NeoTV(NTV300S/NTV300/NTV300SL) keeping Dolby Digital 5.1 sound. 

The Netgear Neo TV is one of the cheapest streaming boxes on the market. NeoTV turns your TV into a movie screen, or a concert hall. It has built-in WiFi from the leader in home networking so it is easy to connect high-speed WiFi delivers the best 1080p HD streaming performance with the reliability you can trust. So there is no any pressure to stream 1080p Blu-ray movies with Netgear NeoTV(NTV300S/NTV300/NTV300SL). For better home theater enjoyment, when you rip Blu-ray to Netgear NeoTV(NTV300S/NTV300/NTV300SL), you can keep 5.1 surround sound. 

How to rip Blu-ray to Netgear NeoTV(NTV300S/NTV300/NTV300SL) with 5.1 surround sound? Actually, you just need a Blu-ay Ripper. The thing is that most Blu-ray rippers in the market can not recognize the 5.1 stunning audios at all, and this may be the probable thing that troubles you a lot. With luck, Pavtube ByteCopy is here for you, which is able to read TureHD audio and DTS Master Audio, and output them as 5.1 or 7.1 channels. 

This Blu-ray Ripper is a powerful program which can easily help you rip and convert Blu-ray(as well as DVD) to Netgear NeoTV(NTV300S/NTV300/NTV300SL) supported popular video format like MKV, MP4, MOV, MPEG-4, WMV, etc as you want. Plus, it enables you to extract audio/music like TrueHD, DTS HD, etc from Blu-Ray disc without losing quality and keep its original and perfect 5.1, 7.1 channels. You can download Blu-ray ripper by using the link below. Read ByteCopy review

Pavtube ByteCopy Trial version - A trial is free but functional-restricted. Lossless output can be used 3 times only. You may download a trial and see how it works. 

Pavtube ByteCopy Retail version. A full version is offered at $42 by Pavtube Studio. 

How to Keep Dolby Digital 5.1 audio when Ripping Blu-ray to Netgear NeoTV(NTV300S/NTV300/NTV300SL)? 

Step 1. Add Blu-ray movies 

Insert Blu-ray Disc into your external or internal BD drive and launch the Blu-ray Ripping program. Click "disc" button to import Blu-ray movies for converting/copying. 


Step 2. Choose output format keeping 5.1 audio 

Select the whole disc, and you are allowed to choose output format via clicking the Format bar. To keep 5.1 surround sound audio, you can only choose lossless MKV as the output format, which is supported by NEOTV. But make sure the original BD disc does contain Dolby audio, otherwise you still can't get Dolby 5.1 audio saved. 


Click settings, you can modify the video bitrate, frame rate, audio sample rate, etc if you want. 


Step 3. Start ripping Blu-ray with 5.1 to NTV 

Before start conversion, select subtitles you want keep with the output video from the option. Then, hit the big Convert button, it will start converting Blu-ray movies to MKV with the original Dolby Digital 5.1 for NTV. 

That's it! Your Blu-ray video will now be encoded and a few hours later you will have a great high definition video file with preferred audio and subtitles. 

NTV300SL (NeoTV Max) supported media file formats 

Below is a list of the supported file formats for video, audio and photo media files that the NeoTV Max can play. 

Supported Video formats : 


File Format


video codec


supported Profile


supported file extension


audio codec


video bitrate


Resolution


MPEG


MPEG-1 Video
MPEG-2 Video


main
high


.mpg, .mpeg, .dat, .vob


mpeg,AC3,Dts,PCM


MPEG2 Video: 80M


1920x1080


AVI


Avi(MPEG2,MPEG4, H264,WMV)


MPEG2: Main, High
MPEG4: Advanced Simple, Simple
H.264: Main, High
WMV: 7,8,9, VC1


*.avi, *.xvid


MP2,MP3,AC3,DTS,PCM,WMA


MPEG2 Video: 80M
MPEG4 Video: 40M
H.264: 50M
WMV: 45M


1920x1080


DivX HT(DivX3,4,5)


MPEG4: Advanced Simple, Simple


*.avi, *.divx


MP2,MP3,AC3


MPEG4 Video: 40M


1920x1080


DivX HD(DivX3,4.5)


MPEG4: Advanced Simple, Simple


*.avi, *.divx


MP2,MP3,AC3


MPEG4 Video: 40M


1920x1080


ASF/WMV


MPEG-4 video /WMV video /VC-1 video


MPEG4: Advanced Simple, Simple
WMV: 7,8, 9, VC1


*.asf, *.wmv


WMA, MP3, PCM, AC3


WMV: 45M
VC1: 40M


1920x1080


TSF


MPEG2,MPEG4, H264,VC-1


MPEG2: Main, High
MPEG4: Advanced Simple, Simple(* DMX SW support)
H.264: Main, High
VC1


.ts, .m2ts, .m2t


MP2, MP3, AC3, AAC, PCM, DTS


MPEG4 Video: 40M
WMV: 45M
VC1: 40M


1920x1080


MP4


MPEG 4 Video, H.264


MPEG4: Advanced Simple, Simple
H.264: Main, High


.mp4, .mov, .QT, 3gp, m4v


AAC,MP2,MP3,AC3


MPEG2 Video: 80M
MPEG4 Video: 40M
H.264: 50M
WMV: 45M


1920x1080


MKV


MPEG2,MPEG4, H264,VC-1


MPEG2: Main, High
MPEG4: Advanced Simple, Simple
H.264: Main, High
WMV: 7, 8, 9, VC1


*.mkv


MP2,MP3,AC3,AAC,DTS,PCM,WMA


MPEG4 Video: 40M
H.264: 50M


1920x1080


OGM


MPEG2,MPEG4, H264,WMV


MPEG2: Main, High
MPEG4: Advanced Simple, Simple
H.264: Main, High
WMV: 7,8,9,


*.ogm


mp3, AC3, LPCM, MPEG, DTS


MPEG2 Video: 80M
MPEG4 Video: 40M
H.264: 50M
WMV: 45M
20M bit/s??


1920x1080


RM


RV30,RV40


.rm,.rmvb


AAC,COOK


MPEG2 Video: 80M
MPEG4 Video: 40M
H.264: 50M
WMV: 45M


1920*1080


FLV


h.264(s.h.263)


H.264: Main, High


.flv


AAC,MP3


1920x1080

Related Articles: 

Source:http://video-tips.jimdo.com/2016/09/16/rip-blu-ray-to-neotv-with-5-1-sound/ 

Easy installation Plex Media Server Raspberry Pi 3 + Image


Install Plex Media Server on Raspberry Pi 3. 

Thanks to the work of uglymagoo on the Plex forum it is very easy to install Plex using the Synology armv7 package (now it uses the ReadyNAS package). The previous Raspberry Pi 2 guide became quite long and cluttered, this one aims to be cleaner. 

There is a Plex Media Server Raspberry Pi 3 image based on the minimal Raspbian distro Minibian at the bottom of this post with the required modification to force Plex transcoding if you just want to test if Plex on the Raspberry Pi 3 will suit your needs. This tutorial assumes you are running Raspbian Jessie. This how-to also has a section on fixing Plex permissions so if your Plex can’t see your folders then you will be able to solve that problem here.Install Plex Media Server on Raspberry Pi 3Installation Checklist 

For the best performance for Plex Media Server on the Raspberry Pi 2 refer to this checklist

  • Verify you have the en_US locale
  • Make sure you have libexpat1 installed
  • Do not use WiFi if you want the best result
  • Monitor Plex Media Server and restart it automatically with this guide.

  • Do not use Plex.tv instead use Dynamic DNS and a reverse proxy with this guide to avoid transcoding problems.
  • If you are having transcoding issues try using an older transcoder with this guide.
Pre-Install Requirements Generate Locales 

First we need to verify the en_US locale is enabled 

This command lists current localeslocale -a 
My output looks like thisC C.UTF-8 en_US.utf8 POSIX 

If you don’t have en_US.utf8 you can generate it 

To generate the locale edit the locale generator configuration file first to enable the localesudo nano /etc/locale.gen 

Uncomment this line by deleting the ## en_US.UTF-8 UTF-8 

Ctrl+X, Y and Enter to save 

Now generate the localessudo locale-gen 

If you get the locale-gen cannot be found error this should solve itecho "export PATH=$PATH:/usr/sbin" >> ~/.profile 

Now generate the locales again if locale-gen wasn’t foundsudo locale-gen 

Reconfigure locales for good measure (source)sudo dpkg-reconfigure locales 

Now run locale to list themlocale 

If you see these errors (on Jessie Lite) follow the next steplocale: Cannot set LC_CTYPE to default locale: No such file or directory locale: Cannot set LC_ALL to default locale: No such file or directory 

Open your environment filesudo nano /etc/environment 

Add these linesLC_ALL=en_US.UTF-8 LANG=en_US.UTF-8 

Ctrl+X, Y and Enter to SaveInstall Plex Media Server on Raspberry Pi 3 using Repository 

Enable https transport or you will get this error: E: The method driver /usr/lib/apt/methods/https could not be found.sudo apt-get update && sudo apt-get install apt-transport-https binutils -y --force-yes 

Grab uglymaoo’s gpg key for his repositorywget -O - https://dev2day.de/pms/dev2day-pms.gpg.key | sudo apt-key add - 

Add uglymagoo’s repositoryecho "deb https://dev2day.de/pms/ jessie main" | sudo tee /etc/apt/sources.list.d/pms.list 

Update your package listssudo apt-get update 

Install Plex Media Serversudo apt-get install plexmediaserver -y 

Upgrading Plex is as easy as running this command 

Note: The repository contains the latest non-Plex Pass version. If you want the Plex Pass version you will have to build it yourself using the manual method 3 outlined here.sudo apt-get update && sudo apt-get upgrade -y 

Check out additional hard drives for your mediaTranscoding Tools 

Plex Media Server requires a new libc6 module that you can pull from the jessie repo (thanks again to uglymagoo). This part may not necessary if you used the precompiled deb package at the top. Sometimes, if your end devices are low, your Plex can't pass-through some videos to play, you can transcode the video in advance with some video transcodersand put the converted video in sharing folder of Plex in advance. 

Install libexpat1 for help playing in the Android appsudo apt-get install libexpat1 -yFix Plex Permission Issues 

If Plex isn’t reading your drives or folders you can do one of two things, change the permissions of your external storage or change the user Plex is running as (which could mean you need to rescan for metadata). 

First try adding your plex user to your regular user’s group that owns the mount point for your hard drivesudo usermod -aG pi plex 

Then add your regular user to the plex group if the plex group existssudo usermod -aG plex pi 

Then set the permissions for the folder containing your media to 775 so the plex in the user’s group can read themsudo chmod -R 775 /folder/with/media 

If that still fails you can change the permissions where /mnt/usbstorage is your mount path for your hard drive so everybody can read, write and executesudo chmod -R 777 /mnt/usbstorage 

Alternatively you can change the user Plex runs as to your pi user 

To change which user Plex runs as, open this filesudo nano /etc/default/plexmediaserver 

Change this line, replace plex with your username you use to log on or the owner of the mounted drive, most likely piPLEX_MEDIA_SERVER_USER=pi 

Ctrl+X, Y and Enter to save 

Change the owner of your Plex folders to the user you are changingsudo chown -R pi:pi /var/lib/plexmediaserver 

Then restart your Plex serversudo service plexmediaserver restart 

If Plex still isn’t working see the manual installation guide.Raspberry Pi 3 Plex Media Server Image 

If you cannot see the unlocker whitelist this site in AdBlock 

Raspberry Pi Plex Media Server Images 

Spread the knowledge to get the Pi goodness 

For the Plex Media Server image, login with root, password htpcguides and use raspi-config to expand the file system, you can install WiFi drivers if they are not included in the kernelapt-get install firmware-linux-nonfree -y 

Enjoy Plex Media Server on your Raspberry Pi 3 

Source 

If you want to stream Blu-ray with Plex on your Raspberry Pi 3 based multimedia devices, here are some tutorials:

Below are some video tools that help you get more entertainment on Plex: 

 You Cloud Download Directly

Pavtube Video Converter Ultimate


An efficient, fast, safe, all-in-one Blu-ray DVD Backup & ripper and HD Video Converter

Free Trial Buy now
Pavtube ByteCopy


An Efficient, Safe, Fast, Easy-to-use Blu-ray DVD converter and Retain multiple audio tracks & subtitles

Free Trial Buy now

Pavtube BDMagic


Pavtube BDMagic is a easily and powerfully BD tool to make Blu-ray movie enjoying anywhere anytime as you like.

Free Trial Buy now
Pavtube DVDAid


A professional yet easy-to-use DVD backing up and ripping tool.

Free Trial Buy now

Related Articles: 
Source:http://device-camcorder-tips.blogspot.com/2016/09/install-plex-media-server-raspberry-pi-3-image.html 

How do I rip Blu-Rays, with a custom crop settings?

Summary: The guide tells you how to crop out black bars/ edges from Blu-ray movies. The Pavtube Video Converter Ultimate let’s you crop letterboxed Blu-ray movies and keep original aspect ratio. 

There will undoubtedly be times when you need to crop your videos while ripping Blu-rays. For example, when your Blu-ray movies have some black bars on top and bottom or you want to crop videos with large dimensions to fit the small screen of devices. Here is the best guide. 

VIDEO CROP VIDEO CONVERTER– PAVTUBE VIDEO CONVERTER ULTIMATE

- Backup, rip and convert Blu-ray/DVD movies

- Manually crop your video black area into different size.

- Also support MP4, AVI, FLV, WMV, MKV, etc.

- Apply effects, use filters, add titles, music and logo as you like.

- Mac users please use Pavtube iMedia Converter for Mac.


HOW TO CROP BLU-RAY MOVIES WHEN RIPPING? 

Step 1: Import Blu-ray to crop 

You can either click "File" on the primary windows and select files from your computer. You can choose "Forced Subtitle" to rip Blu-ray. 


Import video for Gear VR

Import video for Gear VR

Step 2: Crop Blu-ray

Let’s see how to get rid of the black edges. First, you select a chapter, and click “Edit” to enter the Video Editor. Here you see the Original Preview and Output Preview area. Get rid of the black edges: simply move your mouse cursor to drag and adjust the green frame to desired position to remove the black bar. 


Step 3: Choose output format

Click the Format bar, and choose a desired format in “Common Video” group. HD Video formats (1280*720, 1920*1080) are not recommended for common DVD (720*480 for NTSC, 720*576 for PAL). Here I select H.264 Video (*.mp4) in “Common Video” as output format.


Step 4. Start copying cropped Blu-ray to hard drive.

When back to the interface, click the “Convert” button to start cropping and converting Blu-ray movie to hard drive. After conversion completes, click “Open” to find converted movie.

Blu-ray Cropping Tips:

1. It's always a good idea to preview your video before you export them to your hard drive. Make sure the video has not been cropped too much.

2. Make sure the aspect ratio of the cropped video is the same with that of the selected output format.

3. Note that the quality of cropped video depends on the chosen output format to some extent. For example, you have selected small dimensions, but output as large dimensions of the video, the quality would not be good. In such case, smaller output dimensions are preferred.

Related Articles: 
Source: http://multimediatips.jimdo.com/2016/08/03/rip-crop-blu-ray/ 

Tips for Ripping DVD Quickly

Summary: Do you often copy DVDs? Do you think your DVD copy speed is too low? Do you want to copy DVD quickly? Here is the tips for quick DVD copies. 

Most of us have very busy and fast-paced lives andwe get impatient when the world is not moving at our speed. One thing that easily makes us upset is the slow DVD copying, which may take you 3 hours and it is impossible for you to wait all the time in front of the computer. So how can you quickly copy DVD while maintaining optimal quality? Here are some tips to help you create a quick DVD copy so you can move on to the rest of your day. Tips for Copying DVD Quickly 

Computer Hardware 

Having updated computer hardware will greatly increase your overall DVD copy time. The DVD drive installed in your computer tower, along with the processor and the memory are all huge players in speeding up or slowing down your copies. DVD drives play a major role because different DVD drives offer varying speeds. You will want to select a drive that offers the best possible speed for reading DVDs. 

In addition to the DVD drive, the processor also heavily effects the overall copy time because it determines the speed at which your computer can process information. The faster the processor, the quicker your computer can read applications and provide results. The available memory allows your computer to take in information. If the memory is full, your computer will not be able to process any information because it will have nowhere to store it. These are three of the largest aspects to obtaining the quickest DVD copy time. 

Multitasking 

A large part of getting more done in less time is the age-old art of multitasking. Chances are that if you want to copy a DVD quickly, there are additional items on your daily to-do list that need to be done. However, you should not use your computer for other tasks while trying to burn DVD copies in a hurry. 

While computers are capable of running a number of applications at a single time, it doesn't always mean that the applications are running as fast or as well as they could if they were the only application running. Shut down your apps and let your DVD copy software do its job. You will notice a drop in the estimated completion time, and you will have fewer errors in the process. 

Disc Quality 

If you try to copy a DVD that has been scratched or has gotten dirty, expect the overall copy process to take longer. Your will need to bypass error messages to move forward with your copies, and some applications may restart the copy or seize copying because they cannot read the disc. While there is little that you can do for a scratched DVD, some DVD copy applications are designed to mend and copy scratched DVDs. You can and should make sure that your DVDs are clean before inserting them into your computer for a copy. Clean your DVDs carefully so that you don't scratch them in the process. 

DVD Copy Software 

Last but not least, selecting the best DVD copy software is important for faster DVD copies. While the applications do not play as large of a role as the hardware, choosing the right software can assist in or deter from a quicker copy. If you plan to copy a majority of commercial DVDs either to watch in a different format or just to have as a backup make sure that you select the application that has little to no restrictions on copying commercial DVDs. The restrictions could potentially add more time to your copies, and some applications won't allow you to make copies of encrypted DVDs at all. Learn >>DVD Copier Software vs DVD Ripper Software 

Recommended Fast DVD Copy Tool

Pavtube ByteCopy is the right software I've found so far to save you a significant amount of time. Scroll down for more detailed info.

6× faster converting speed, rip DVD titles in batch. With multithreading technology and multi-core processing, the fastest DVD ripper, ByteCopy is fast in loading DVDs, and rips DVDs in a matter of a few minutes with no freezing.

Rip encrypted DVD movies without any hassle. One impressive feature embraced by the fastest DVD ripper program is its ability to rip copy protected DVDs fast from Paramount, Diseny, Pixar, Dreamworks, Warner Bros, etc. It bypasses any DVD protection technology automatically, be it the newest Disney DRM, region code (1-6), CSS, UOPs, RCE, etc. The fastest DVD copy software can handle damaged DVDs without stuttering, as well.

1:1 rip DVDs with unchanged video quality. You'll be always able to get awesome output quality. You don't have to sacrifice any quality with the fastest DVD ripping tool. High Quality Engine embedded into the the best quickest DVD ripper keeps speed and quality in good balance. The interface is clean, making it deadly easy to rip movies on DVDs.


How to Rip DVDs with the Fastest DVD Copier Software?

1: Download and install the DVD Ripper abd run it. Insert DVD to computer drive, click "Load from Disc" icon to load the DVD.

2. Choose output format. The fastest DVD converter enables you to rip and convert DVD to lossless MKV and multi-track MP4, AVI, MOV, etc. digital video format, copy DVD to iPhone, iPad, Samsung, Android etc. Mobile devices, or main title copy, full title copy.

3. Click "Browse" button to select a destination folder to save the DVD copy file. Make sure the space is larger than that of the file.

4 Click "Convert" button to start to copy DVD with the fastest ripper.

By implementing these tips for quick DVD copies, you should find that your DVD copy time has dropped and you are able to get more done in less time. If you find yourself copying DVDs often, we recommend updating your computer hardware and spending the money for a reliable DVD copy application. Don't forget to make sure that your DVDs are clean and unscratched, and you will reach optimum copy times.

Related Articles: 
Source: http://multimediatips.jimdo.com/2016/08/17/tips-for-copy-dvd-quickly/ 

25% Off on ByteCopy + Video Converter Ultimate Halloween Coupon

Do you love movies or produce your own film in the daily life Do you have the need of converting videos such as converting PVR video and ripping Blu-ray and DVD discs Have you already invested a Blu-ray Ripper or Video Converter What plan do you have for celebrating Halloween Whether you have a plan to purchase something discounted at Halloween big promotion or not, you shouldn't miss Pavtube ByteCopy + Video Converter Ultimate software bundle promotion at Halloween. 


This Pavtube Software bundle includes a top-ranked Blu-ray Ripper, highly praised in many online reviews and a Video Converter Ultimate that can transcode many kinds of video files such as normal MKV, MP4, AVI, etc and some MTS, TOD, MOD, TS, VOB, MPG, Tivo, etc. Generally, Pavtube ByteCopy is $42 while Pavtube Video Converter Ultimate is $65. In the bundle, the total price is $79.9, saving 27.1 in this Halloween software bundle deal. Now, let's learn the key features of these two applications in detail at below:


ByteCopy + Video Converter Ultimate


Original Price: $107 Now: $79.9


Video Converter Ultimate Key Features

- Full disc copy with original BD/DVD structure

- Convert/Rip/Transcode BD/DVD/Video to virtually any video/audio format

- Save a 100% intact BD M2TS/ DVD VOB movie without extras

- A professional video editing tool with trim, crop, split, merge and other options

- Save TiVo, MXF, MOV, M2TS videos in HD quality without playback limitation

ByteCopy Key Features

- Preserve a 100% BD M2TS/DVD VOB movie without extras

- Lossless BD/DVD to MKV backup with multiple audio/subtitle tracks

- Convert BD/DVD to Multi-track MP4/MOV/AVI, H.265, M3U8, etc.

- Backup Blu-ray/DVDs on Plex, Roku 4, WDTV Live, Popcorn and more HD media players

- Export single SRT subtitle file


Apart from this Halloween Software Bundle Promtion, Pavtube Studio is also offering some other Halloween Coupon Deal like


For more Pavtube Halloween Promotion, read Pavtube 2016 Halloween Promotion Learn More Pavtube 2016 Halloween Promotion Software Bundles


ByteCopy + DVD Creator


Original Price: $77 Now: $44.9


Video Converter Ultimate + ChewTune


Original Price: $94 Now: $74.9


ByteCopy + ChewTune


Original Price: $71 Now: $54.9


Video Converter Ultimate + DVD Creator


Original Price: $100 Now: $64.9


Src: http://formatplayable.jimdo.com/2016/11/02/pavtube-software-bundle-halloween-promotion/